


EXPOSING THE BIG LIE THE OSIRIS SHAFT AT GIZA AND ITS MYSTERIES THE PYRAMIDS ARE TOO OLD THE TRUE LOCATION OF THE ROYAL TOMBS AT GIZA A KING EIGHT FEET TALL THE ‘LOST KINGS’ AND A PYRAMID OF THE FIRST DYNASTY THE SPHINX AND THE VALLEY TEMPLES AT GIZA STONEHENGE IN AFRICA 
 |
Supplementary images not incuded in the book can be found here and animations with voice over can be found in the Multimedia section.  SUPPLEMENTARY PLATE 7-1 . 
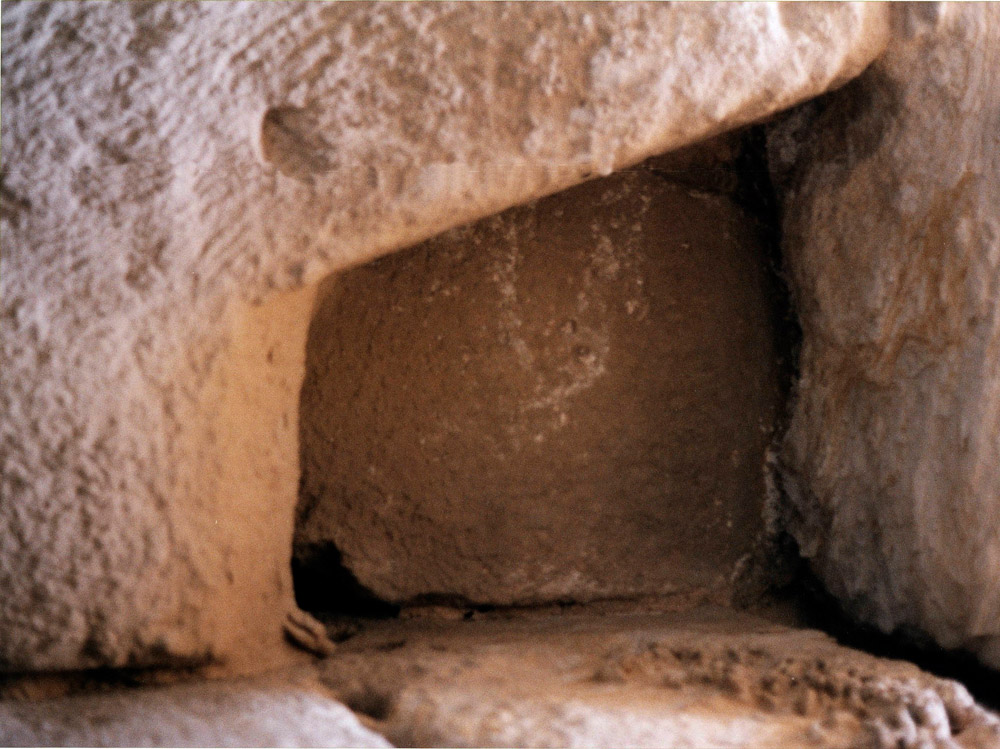
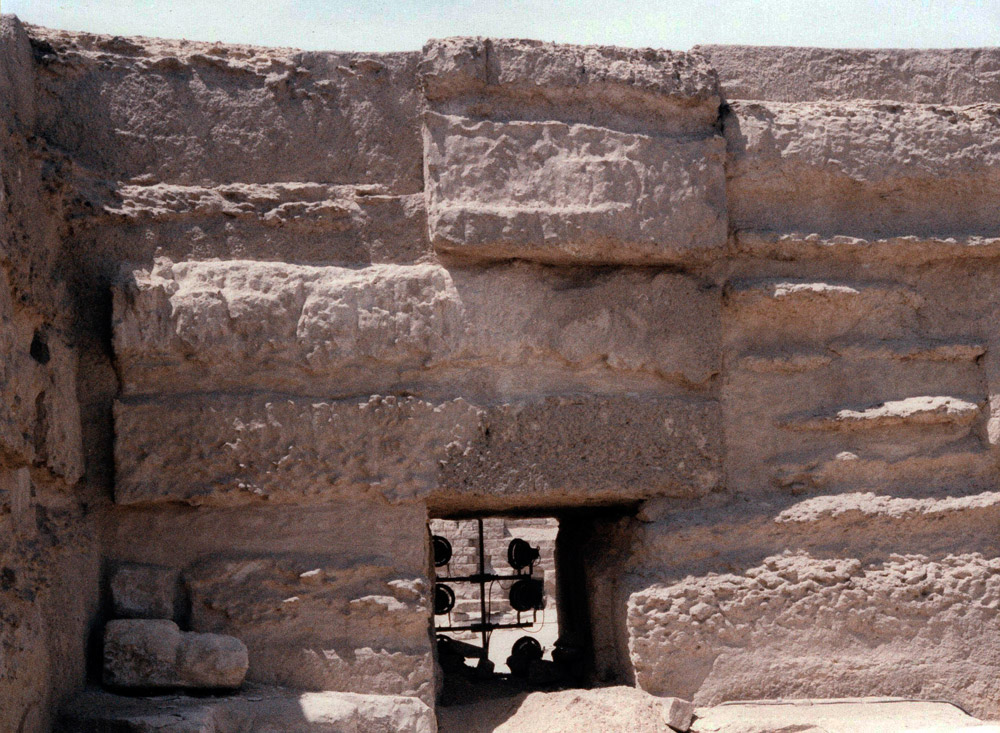
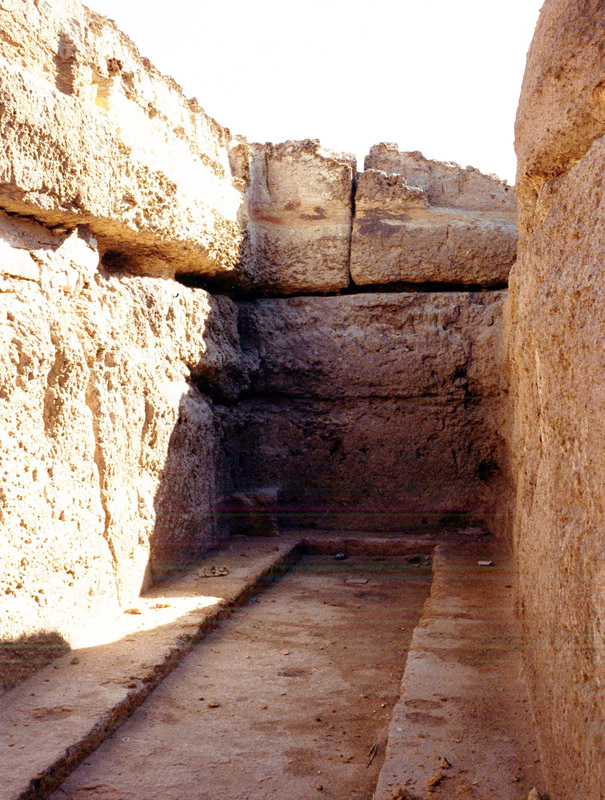
SUPPLEMENTARY PLATE 7-1. The Sphinx Temple has various strange design features. At the western end, there is a pair of these seemingly inexplicable chambers of a kind which tend to be called ‘magazines’, i.e. are assumed to have been storage rooms of some kind. This is the North-West ‘magazine’ in the North-West corner of the temple. The western wall of the temple is on the right. A twin of this chamber is in the South-West corner of the temple. Anyone’s guess is as good as another’s, but my guess about these two chambers is that they were used for the storage of boats, which were lifted out, passed over the wall to the right, and set down in the water of the Sphinx Moat for special ceremonies. The floor design suggests something of this sort, since it seems obvious that something was stored here which was long and narrow and had its bottom along the centre, and the stone walkway surrounding the chamber on three sides suggests a means of access by foot to the sides and far end of something long and narrow. What besides a boat? For those who refuse to accept the idea of a Sphinx Moat, the chambers could still have contained long boats nevertheless, since we know that ‘sacred barques’ were carried in procession at Giza during the Festival of Sokar. I therefore suggest that the North-West Magazine and the South-West Magazine were storage chambers for long ceremonial boats, whether sacred barques which never touched water, or real boats lifted over the wall into the Moat. SUPPLEMENTARY PLATE 7-2 .
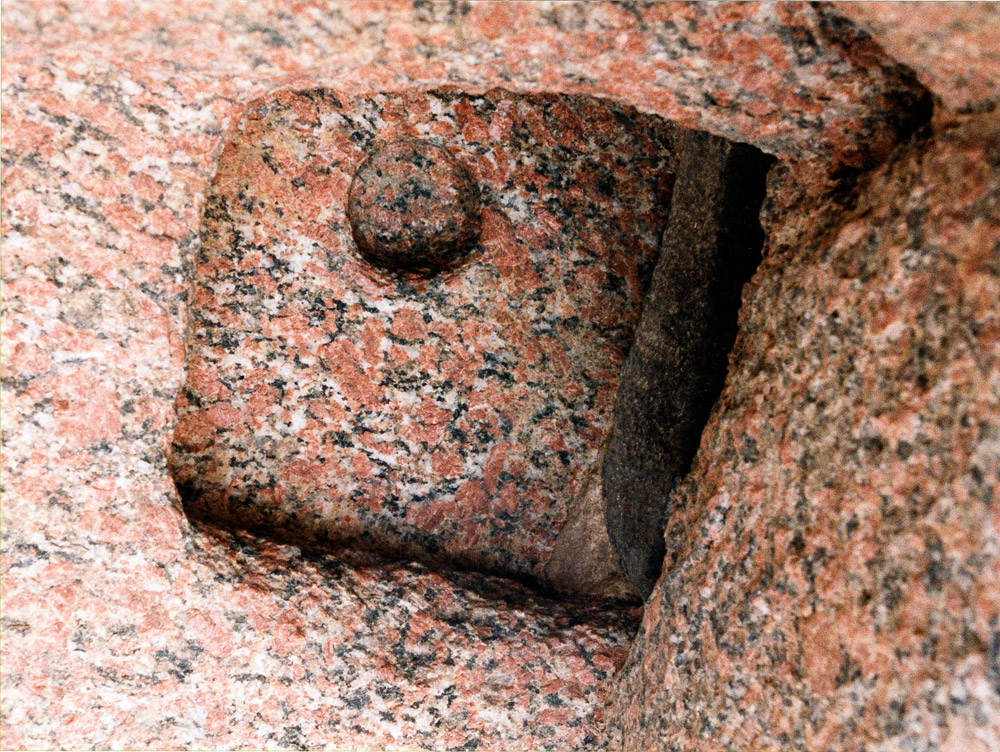
SUPPLEMENTARY PLATE 7-2 This view at sunset of the two ‘magazines’ in the northwest corner of the Sphinx Temple allows us to see many of their features more clearly than is possible in the glare of the sun during the day. Two thirds of the surviving height of the magazines has been cut from the bedrock, and above that, limestone blocks have been laid. Why were the indentations cut into the bedrock floors so meticulously? If the magazines were only used to store normal sacred objects, the indentations would appear to have no purpose. Each magazine also has a small block protruding at the top left corner of its floor, again of no known purpose. The western wall of the temple is at right, and beyond it is the Sphinx Pit, or Sphinx Moat as I have suggested that it was in Old Kingdom times, in The Sphinx Mystery. The fact that part of the western wall of this temple, which is the eastern barrier of the Moat, was carved out of the bedrock substantiates the thesis that the Sphinx Temple was meant to act as the eastern barrier of the Moat. Also, as I suggested in The Sphinx Mystery, I believe that these ‘magazines’ were used to store small boats. The small block at the corner of each magazine would be the surface on which one would rest the small anchor of each boat. SUPPLEMENTARY PLATE 7-5 . 
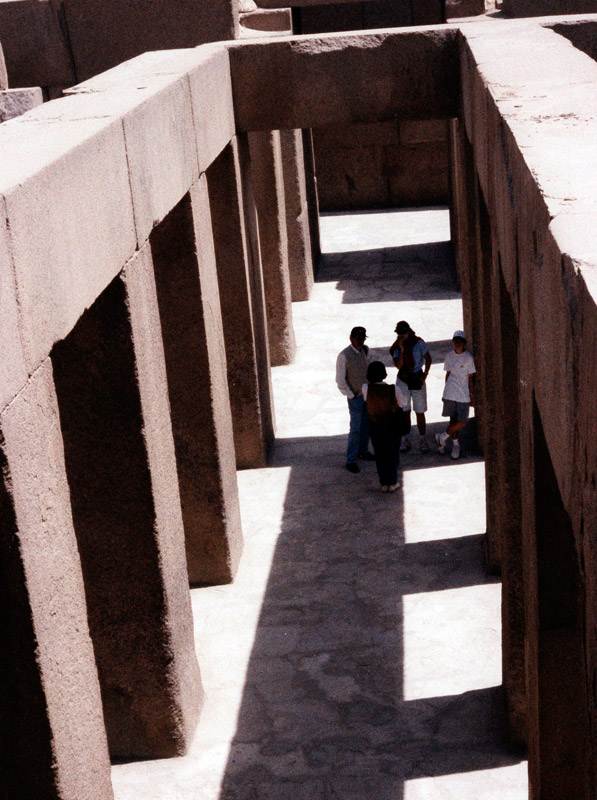
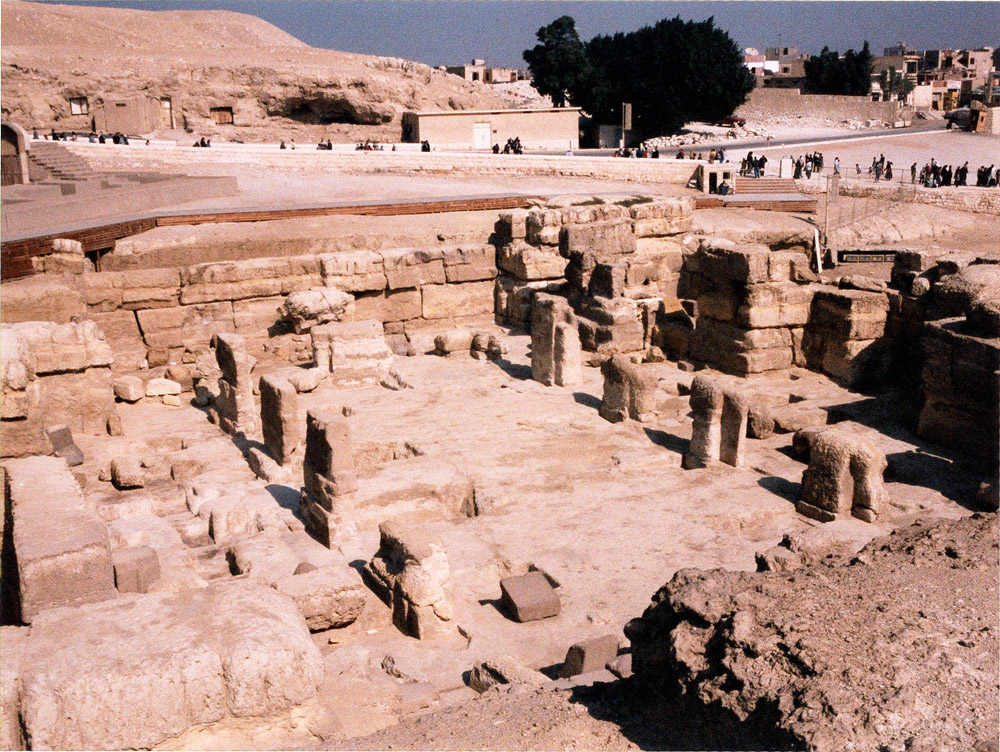
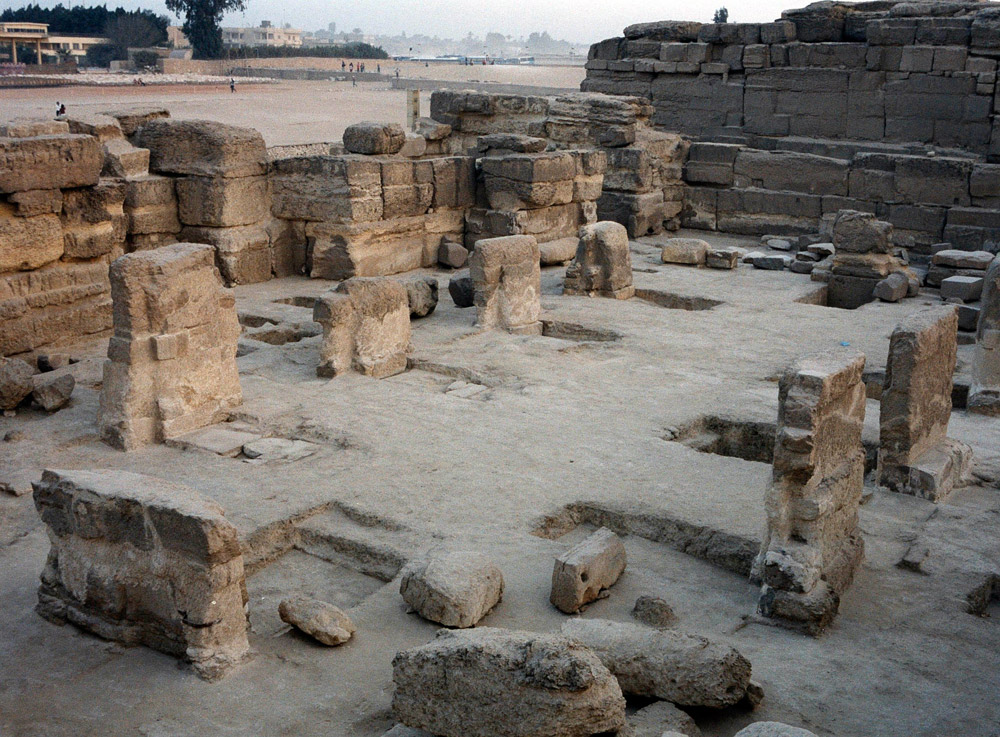
SUPPLEMENTARY PLATE 7-5 The Sphinx Temple at sunset, seen from the north. In the background is the much higher and massive north wall of the Valley Temple. Here we can see clearly the very strange pits in front of each of the columns in the courtyard. They are far too large to be statue bases of standing statues, and Ricke thinks that they were the bases of seated statues. However, no statue fragments were found in the excavation of the Sphinx Temple, although in the adjoining Valley Temple and in the Funerary Temple of Chephren at the foot of the Pyramid of Chephren, such fragments were plentiful. The doors to the temple were too narrow either to admit large statues of to allow them to be carried off. So what is the answer to this enigma? What were the statues, how did they get in there, and how did they get out? SUPPLEMENTARY PLATE 7-6 . 
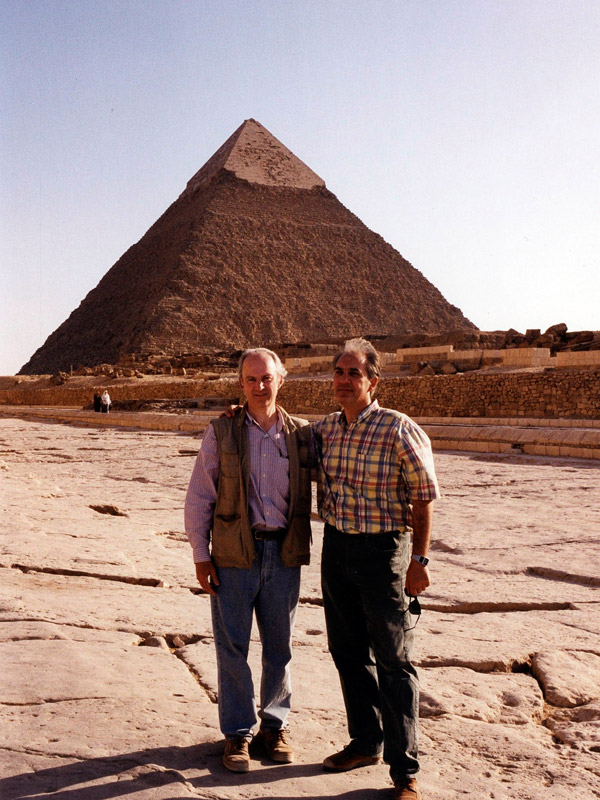
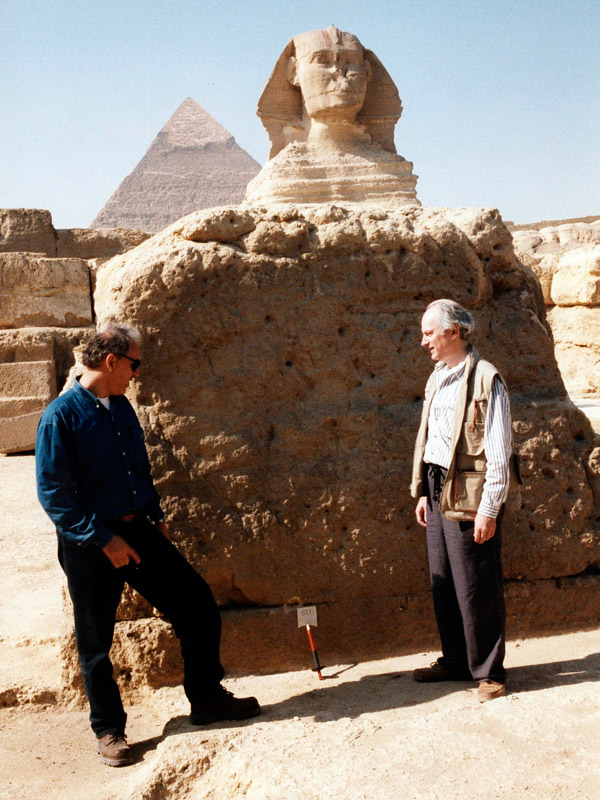
SUPPLEMENTARY PLATE 7-6. Ioannis and myself standing in front of the massive limestone north wall of the Sphinx Temple, with the Pyramid of Chephren in the background. On the other side of this wall is the North trench (Plates X and X), cut out of the solid bedrock in ancient times. According to Herbert Ricke, no cladding of this wall by granite blocks was ever carried out within the North Trench, which was left free. This limestone wall was therefore the sole wall layer in the north. But the blocks are truly gigantic, and some of them must weight 100 tons. (Photo by Olivia Temple) SUPPLEMENTARY PLATE 7-7 . 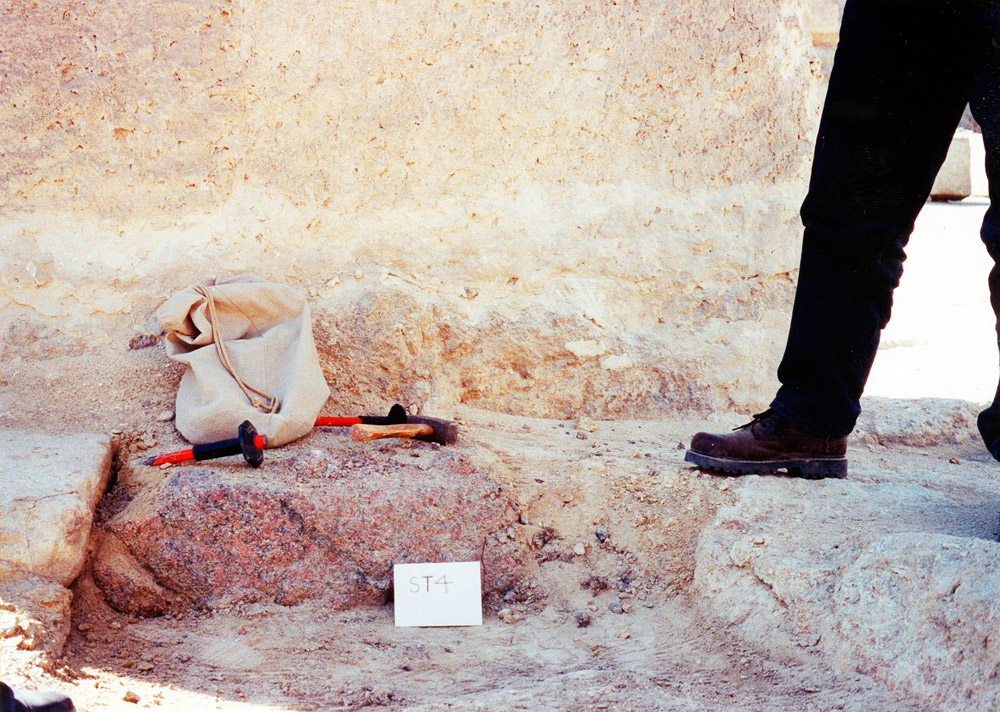
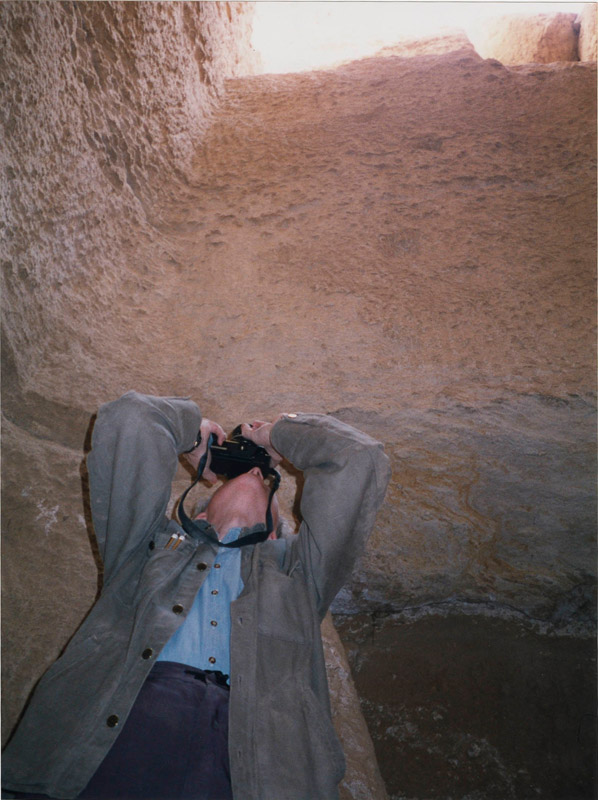
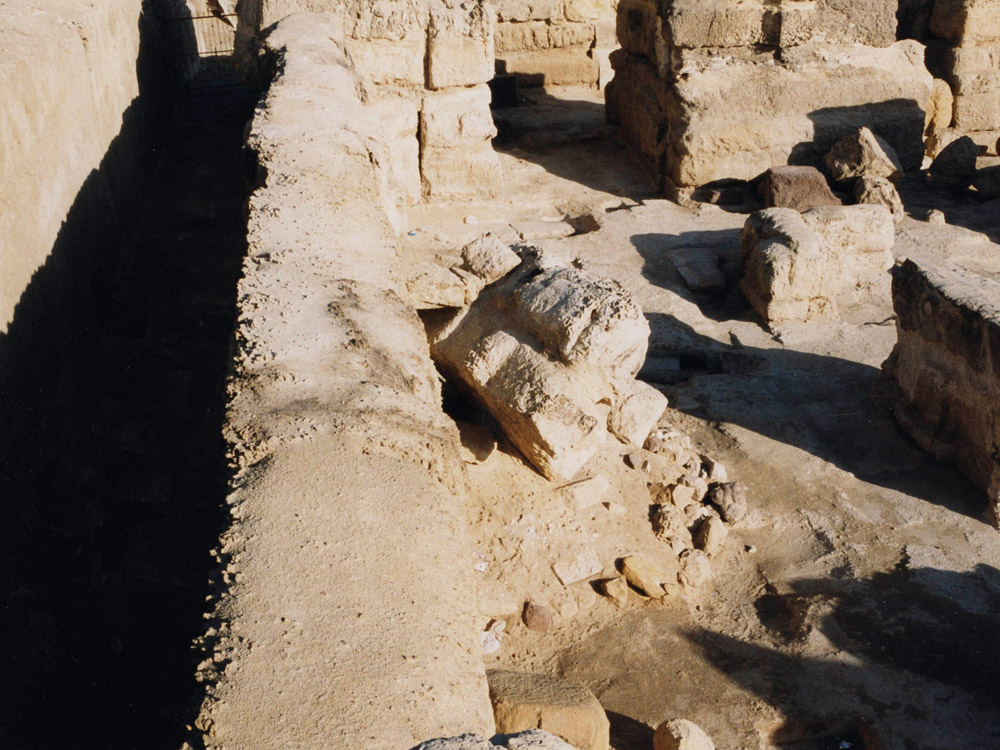
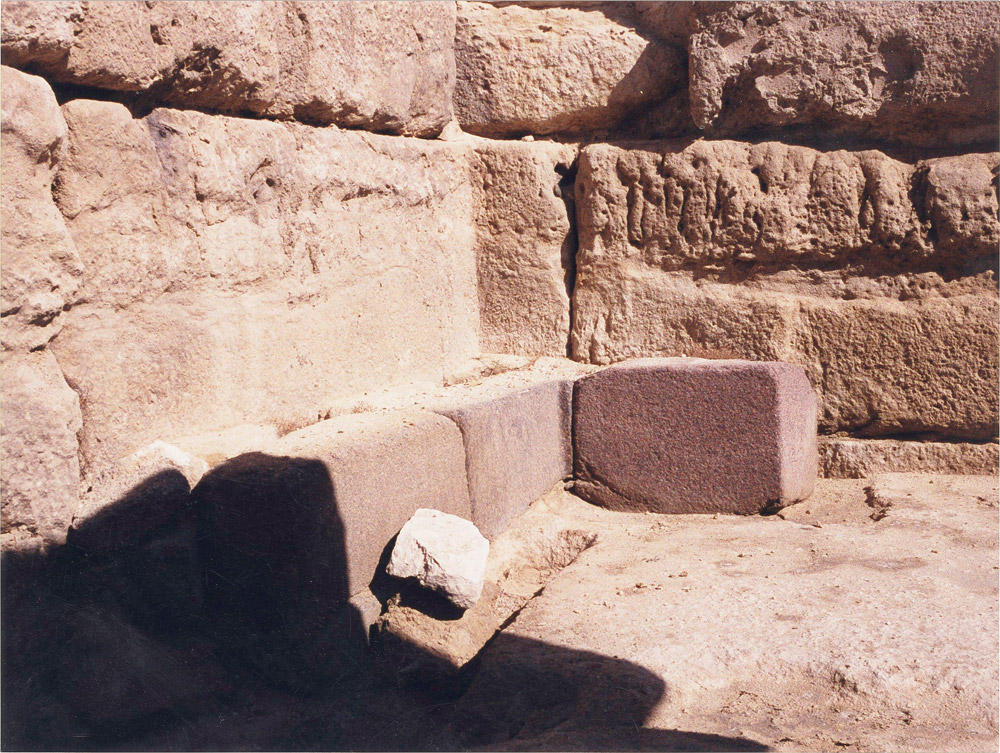
SUPPLEMENTARY PLATE 7-7. Sample ST-4 from the Sphinx Temple, which showed the greatest age of all the samples, was taken here. This granite block is below one of the limestone columns (upper part of the photo) in the central hall, inserted into one of the depressions carved into the bedrock at the foot of each column (see SUPPLEMENTARY PLATE 7-5). We took the sample from the bottom of the granite block where it was pressed tightly against the bedrock. No one knows what the depressions cut into the bedrock were for, as it seems unlikely that they were for statues (see text for explanation of this point). SUPPLEMENTARY PLATE 7-9 . 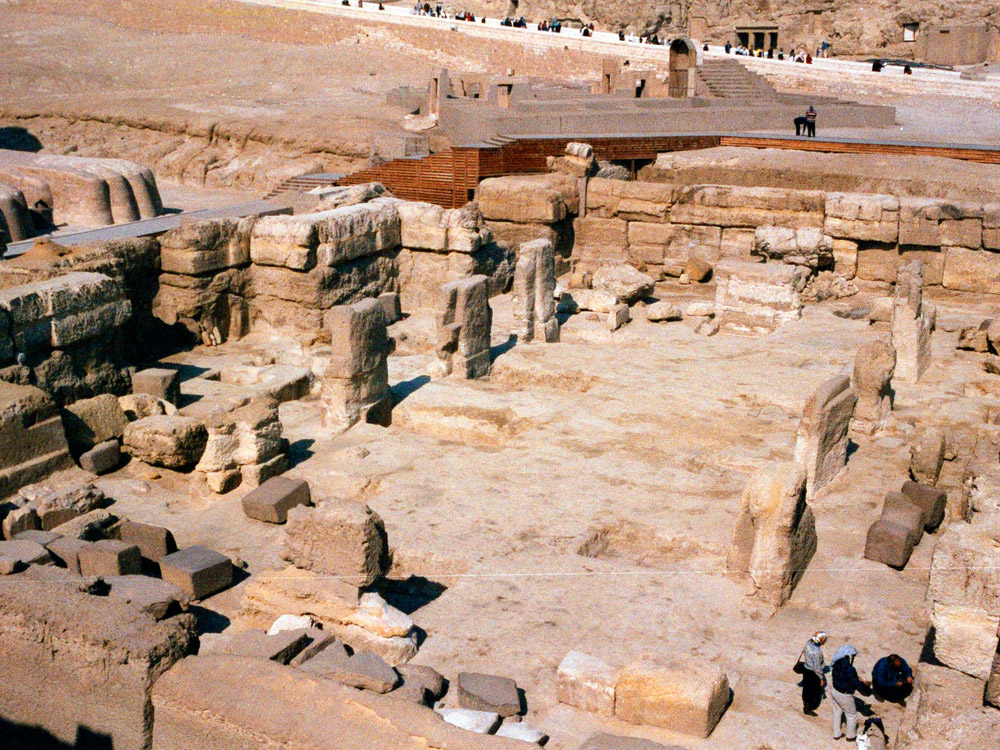
SUPPLEMENTARY PLATE 7-9. The court of the Sphinx Temple seen from the northeast corner of the roof of the Valley Temple. In the bottom right hand corner, Ioannis is attempting to get a sample, observed by antiquities inspectors. At the far top left may be seen the paws of the Sphinx. At the top of the photo may be seen the remains of a New Kingdom temple built to honour the Sphinx (for more photos and description see my previous book The Sphinx Mystery, 2009), during which time the Sphinx Temple was buried and its existence wholly forgotten. In the left foreground, three large white stones may be partially glimpsed, which are the huge chunks of stalagtite or stalagmite from the secret caverns below the temple which were discussed in Chapter Four. SUPPLEMENTARY PLATE 7-12. 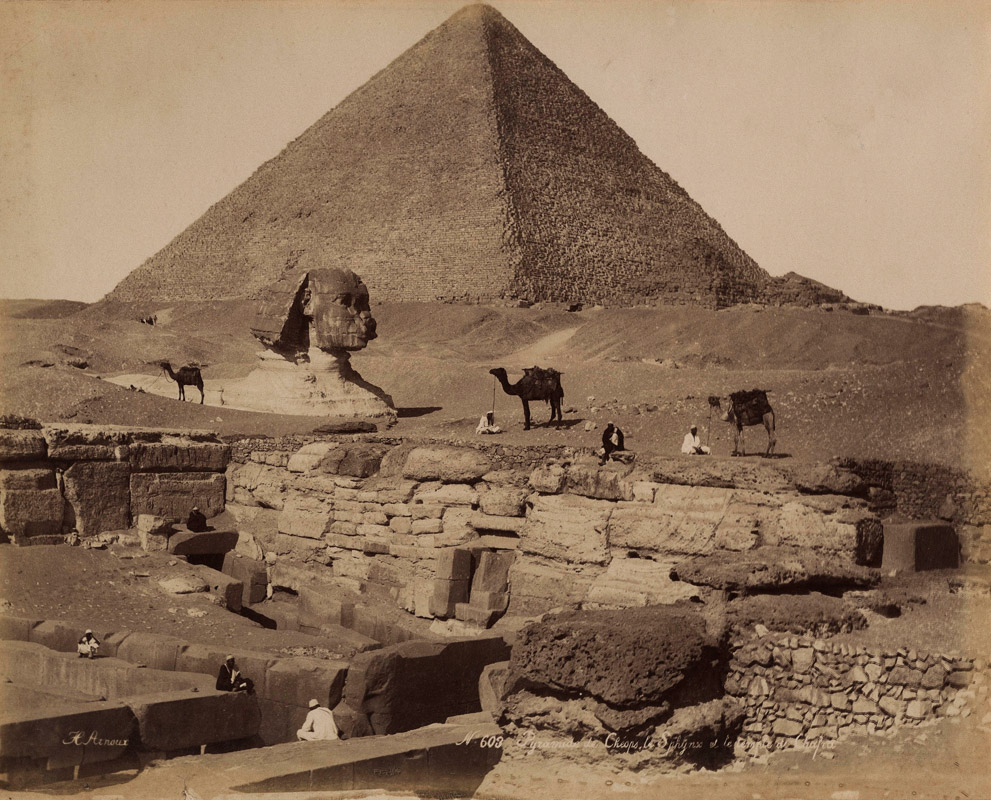
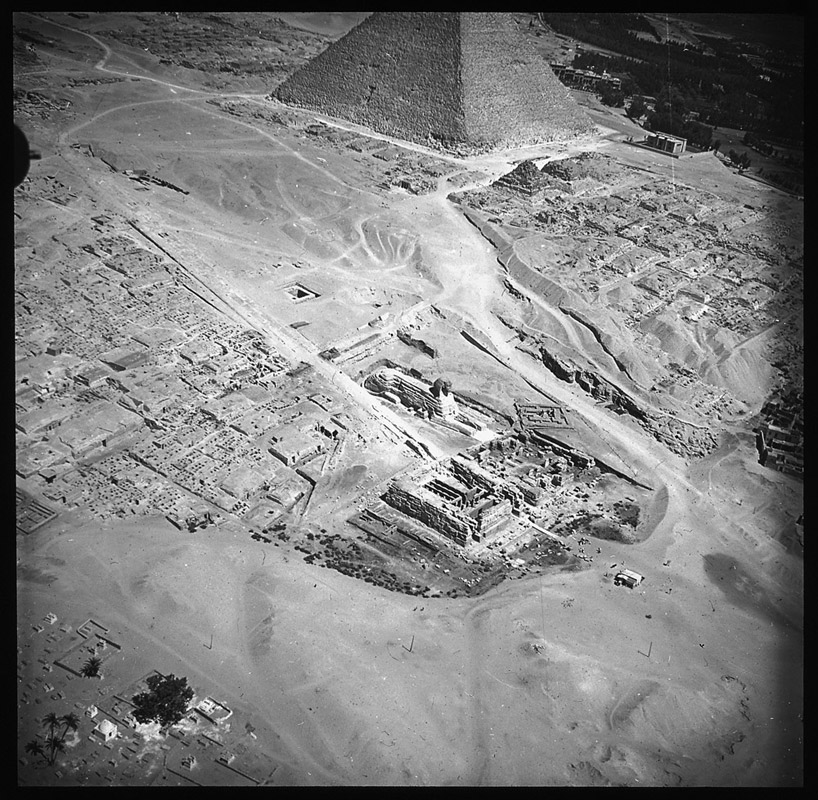
SUPPLEMENTARY PLATE 7-12. The Great Pyramid and Sphinx seen in the late 19th century, prior to 1890, from the mound of sand covering the southeast corner of the east wall of the Valley Temple, at the time when the exterior of the temple was still unexcavated. In the right foreground at this time, a crude late stone wall running east-west still abutted the east wall of the temple, which was removed when the exterior of the temple was finally excavated. (Photo by Hippolyte Arnoux, Collection of Robert Temple) SUPPLEMENTARY PLATE 7-13. 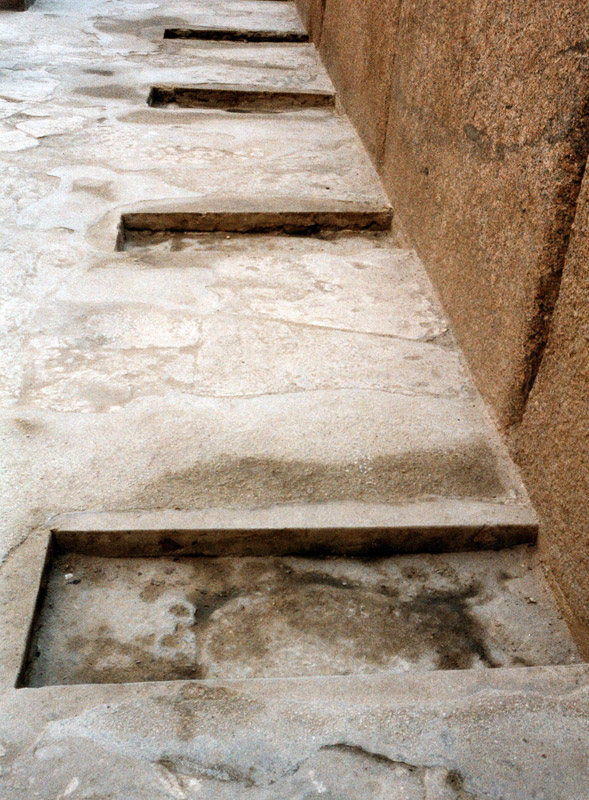
SUPPLEMENTARY PLATE 7-13. Several of the ‘statue bases’ in the Pillared Hall of the Valley Temple. See also Uvo Hölscher’s amazing reconstruction of this hall as he believes it would have looked at the time of Chephren, drawn for him by the artist A. Bollacher, and reproduced in my previous book The Sphinx Mystery as Figure 2.3. This photo also shows that the thin alabaster floor was laid up against the pre-existing granite and may be a later addition. SUPPLEMENTARY PLATE 7-14. 
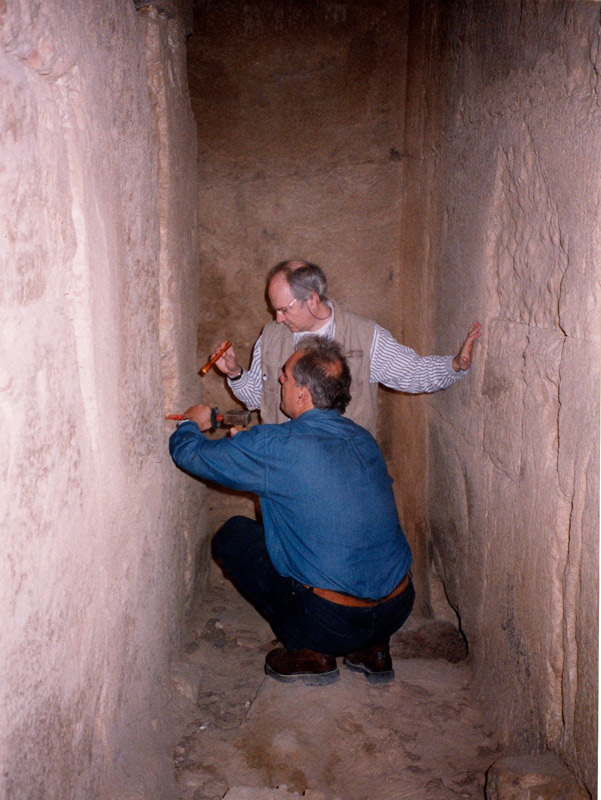
SUPPLEMENTARY PLATE 7-14. Olivia and Ioannis, with two Giza antiquities inspectors, standing in the corridor which runs (north-south) in front of the six magazines inside the Valley Temple. They are looking baffled because they do not know how we are going to get up into the top three magazines. A ladder was eventually sent for. It was in one of the upper magazines that we obtained the granite sample VT-1 giving a date for the temple. SUPPLEMENTARY PLATE 7-15. 
SUPPLEMENTARY PLATE 7-15. A granite block lining the Ascending Passage in the Valley Temple, set against the limestone north wall. It is cut square at the base and sloping on top, in the direction of the slope of the passage, though at a lesser angle. However, by the time we reach the top of the passage, the equivalent granite block (see Plate X) is at the full ‘golden angle’ of the passage slope itself. SUPPLEMENTARY PLATE 7-16. 
SUPPLEMENTARY PLATE 7-16. The ‘crazy paving’ of the granite walls inside the Valley Temple at Giza. Sometimes it seems as if someone were having fun playing with a jigsaw puzzle, putting all the blocks together in this way. Of course, it provides extra strength to have all the edges and corners fitting into each other like this. This is ‘Egyptian Polygonal’ masonry. SUPPLEMENTARY PLATE 7-17. 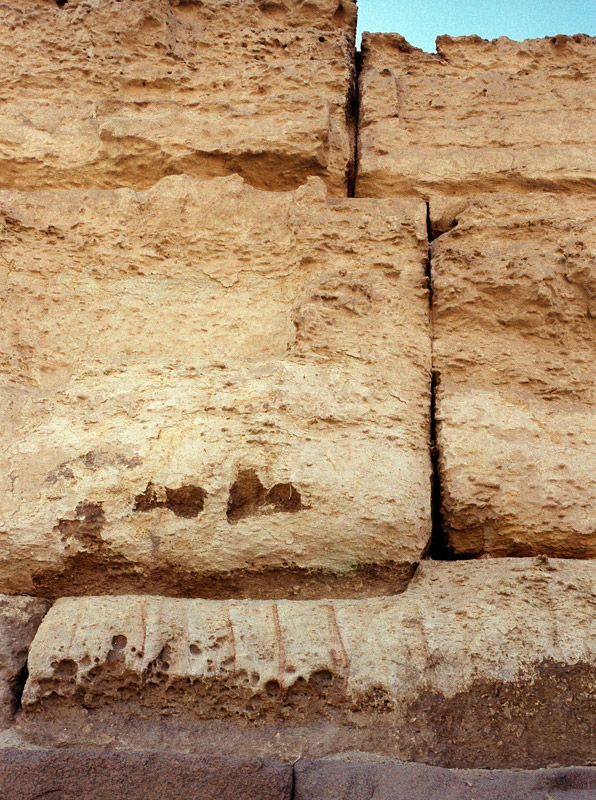
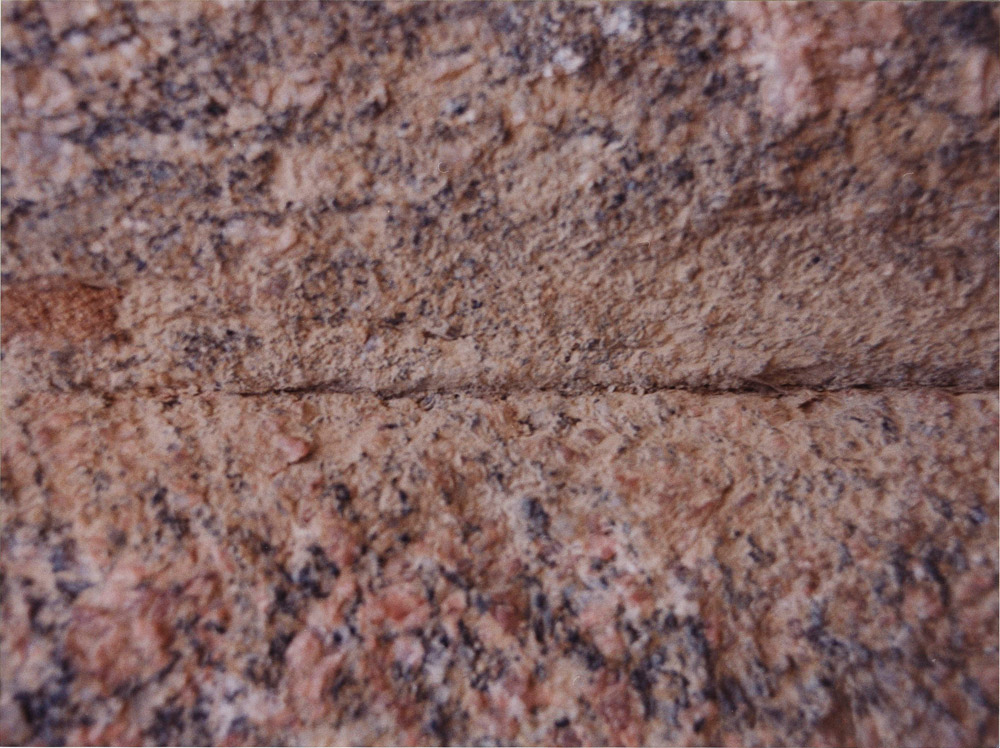
SUPPLEMENTARY PLATE 7-17. The massive limestone blocks of the north wall of the Valley Temple are not simply dumped on top of one another. A closer inspection can reveal, as in this photo, that they sometimes interlock like pieces of a puzzle, even though they may weigh as much as 100 tons apiece. SUPPLEMENTARY PLATE 7-18. 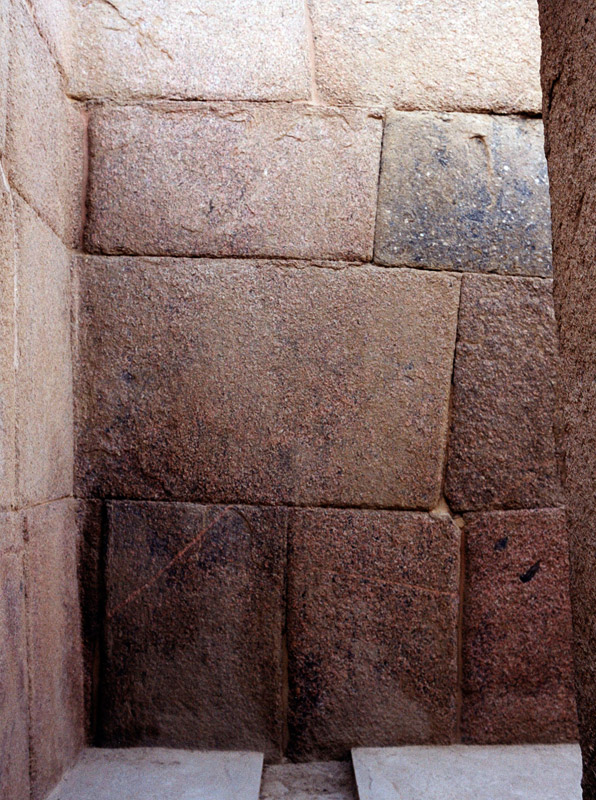
SUPPLEMENTARY PLATE 7-18. The granite blocks at the northwest corner of the Pillared Hall of the Valley Temple have been constructed in such a way that the northern ones are ‘bent’ downwards towards the right, as if in ‘sympathy’ with the Ascending Passage on the other side, which ascends from right to left at an angle of 26° 34’ from right to left of this picture. The peculiar thing about these ‘bent’ blocks is that there is a massive thickness of wall behind them, and they are certainly not actually adjacent to the Ascending Passage. The so-called ‘Porter’s Lodge’ is within this wall, but further to the right (it is entered by a door in the south wall of the Ascending Passage, seen in Plates X and X). I believe these blocks conceal an entrance to a subterranean chamber complex, and that an anteroom chamber leading to a descent into it is at this point, thus filling the space in the wall between the ‘Porter’s Lodge’ and the west wall of the temple. The key block to remove in order to gain access is the one at bottom left, which is holding up nothing and is merely filling space. If removed, the block above it will remain in place. However, this stone is ‘sealed into place’ by the alabaster floor having been laid right up against it, so it would be necessary to saw off the end of that alabaster slab, lift it up, and replace it later, the only trace remaining after replacement being a slice-mark. I discussed the probability of a sealed chamber beneath this end of the Ascending Passage originally in The Crystal Sun in 2000, but no one took the hint. SUPPLEMENTARY PLATE 7-19. 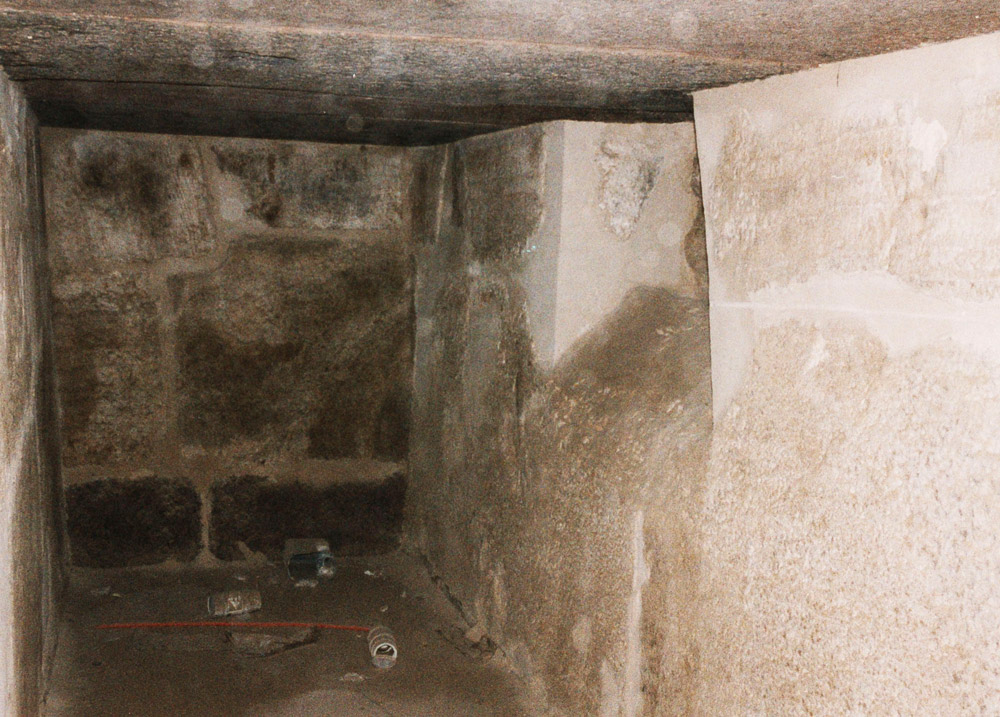
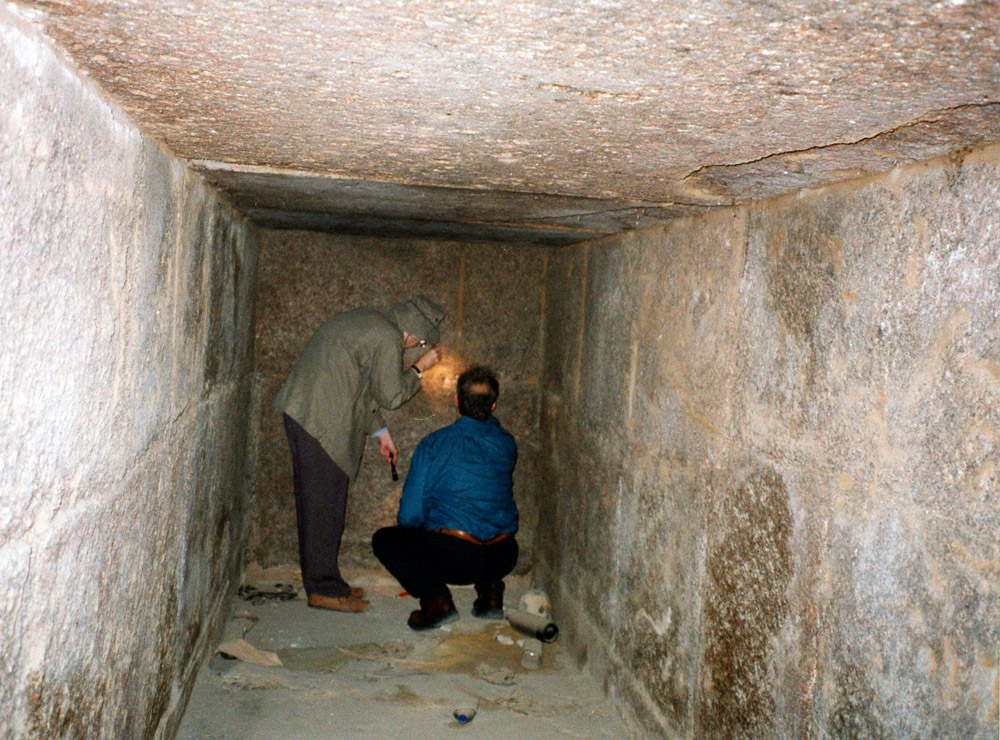
SUPPLEMENTARY PLATE 7-19. An intact ventilation shaft (right) opens into the magazines inside the Valley Temple. This is one of the magazines of the top level (there being two levels), and is the northernmost one. The wall at the far end is the west wall of the magazine. Modern cement has been used to patch gaps in the wall, probably in the 1920s. Huge granite beams lie across the top of the magazine as its ceiling. Some of our equipment lies on the floor. These magazines are intensely radioactive, as we discovered with Ioannis’s gamma radiation detector, and would have killed off bacteria in corpses by irradiation, just as granite sarcophagi would have done. I believe this was an accidental aid to mummification, the cause of which would naturally never have been known to the Egyptians. Anyone working for a prolonged period in the Valley Temple magazines would have developed leukaemia or some other form of cancer within twenty years, so there must have been a rapid priestly turnover. I believe it is likely that mummified corpses of distinguished persons probably rested in these magazines during their ‘curing’ period of seventy days, but certainly no sarcophagi or coffins could ever have been brought in, as the entrance is too narrow for that to be possible. It is possible that these mysterious magazines had some use which we cannot at present imagine. I believe that above the wall at the far end is a concealed chamber, inside a strange limestone ‘box’ which sits on the roof. A probe of the ‘box’ should be undertaken, and it would not be at all difficult with fibre optics to discover the truth about what lies within it. It might give the answer to the purpose of the magazines. SUPPLEMENTARY PLATE 7-20. 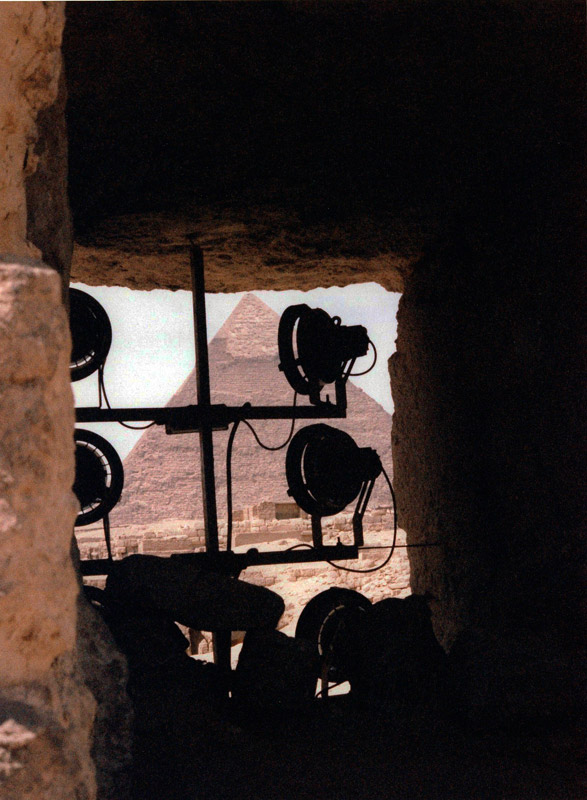
SUPPLEMENTARY PLATE 7-20. Looking through the window at roof level of the Valley Temple, we see the Pyramid of Chephren beyond, and the son et lumière lights, which have been mounted on a metal frame fitted into holes drilled in the stone. The depth of this window gives an impression of the immense thickness of the walls and the limestone blocks which comprise it. SUPPLEMENTARY PLATE 7-23. 
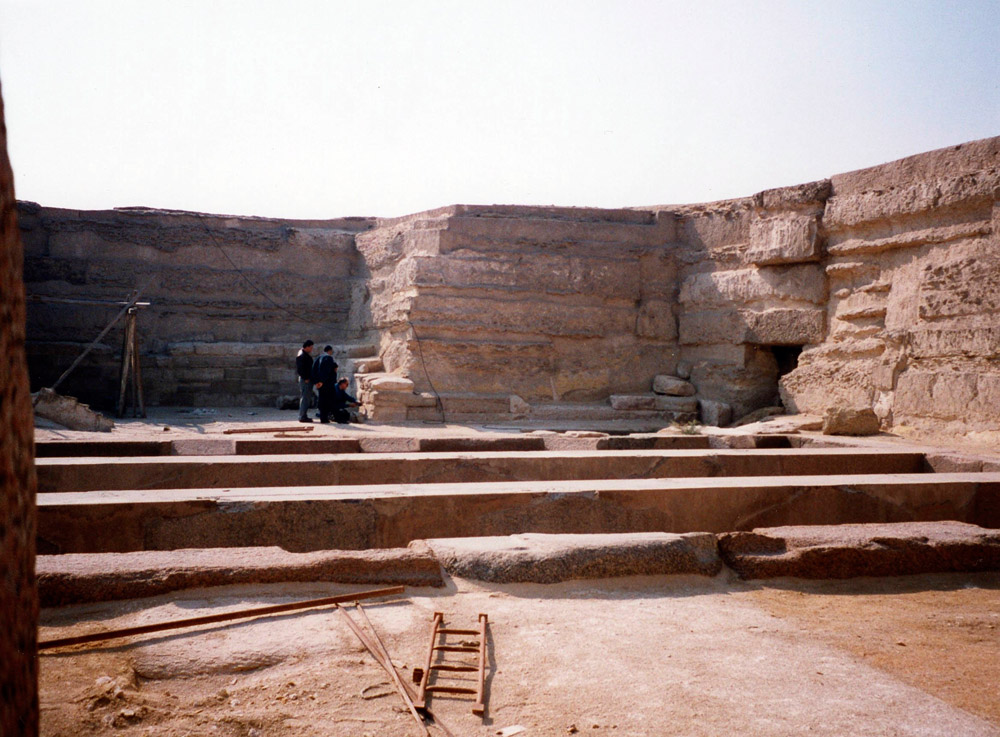
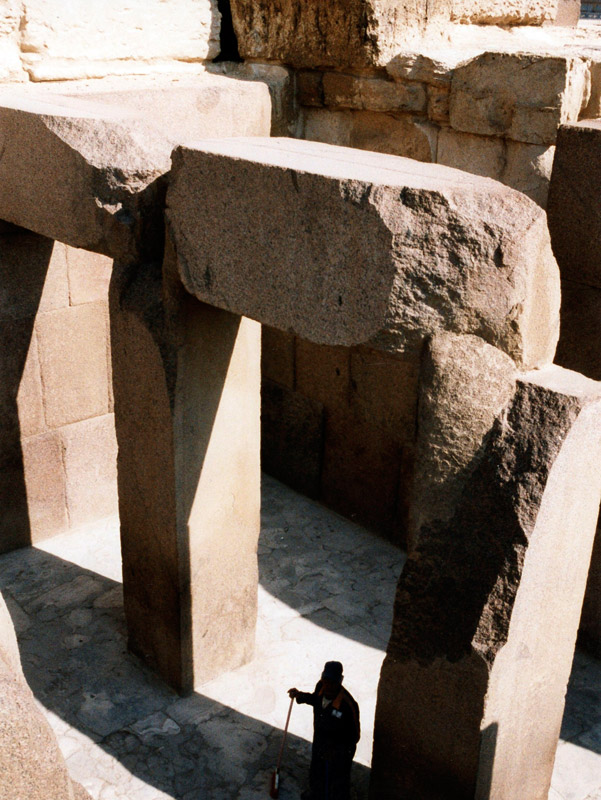
SUPPLEMENTARY PLATE 7-23. The T-shaped Pillared Hall of the Valley Temple seen from the top of the west wall of the temple, at the base of the ‘T’. The architrave is missing which would have bridged the gap at the entrance to the third row on the left of the photo. It was probably one of the granite blocks which had fallen down and were blown to pieces with gunpowder by the vandal Auguste Mariette, in the 19th century (see text). SUPPLEMENTARY PLATE 7-25. 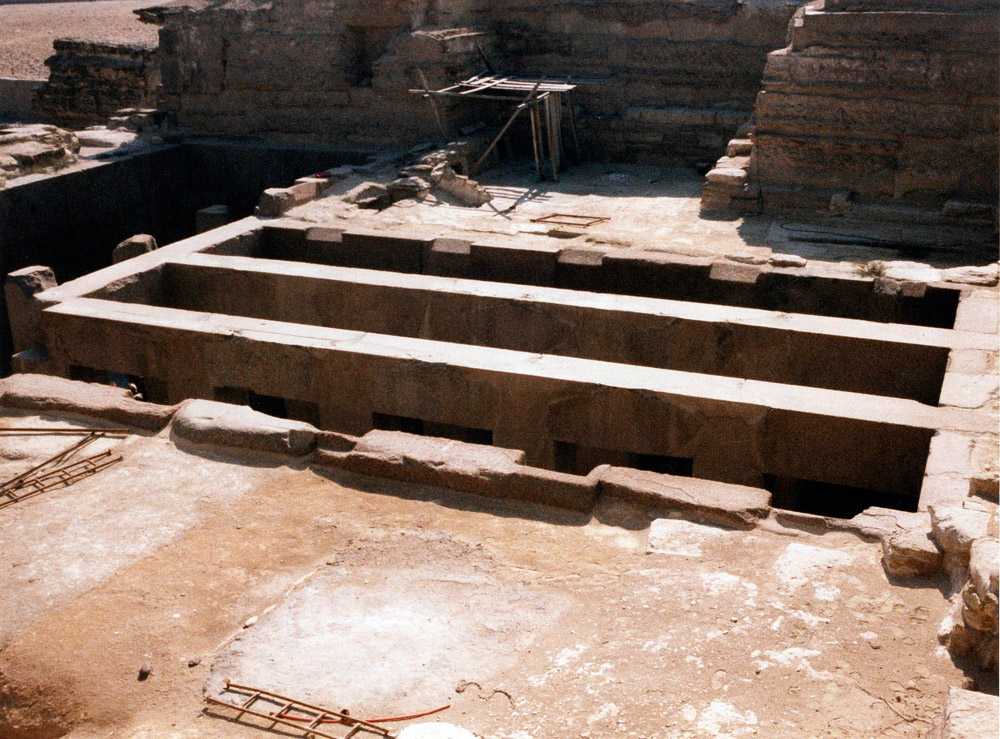
SUPPLEMENTARY PLATE 7-25. The roof of the Valley Temple from the northwest, showing the top of the western end of the Pillared Hall. Beneath the small scaffolding at top centre of this photo, there are two black holes in the base of the wall, facing west. These are openings of the two intact ventilation shafts leading down into the magazines. A small amount of light would also have reached the magazines through these openings in antiquity, but not enough to see by unless you were an owl. The magazines do not seem to have been illuminated, merely ventilated. This gives us further encouragement to regard them as having been used for storage of some kind, but not storage of a large number of objects which would have required light to sort through them. On the other hand, the door to the magazines and the necessity of being in the magazine corridor are so restrictive that large sarcophagi could never have been brought in, or out of course. Nor is there any access to the top magazines except by ladder, so that heavy objects could not have been lifted in and out. What were the magazines used for? Perhaps the ‘curing’ of corpses of distinguished people who were in the process of mummification, as it was the custom to leave them ‘curing’ for seventy days, to match the period during which the sacred star Sirius remained below the horizon every year. SUPPLEMENTARY PLATE 7-27. 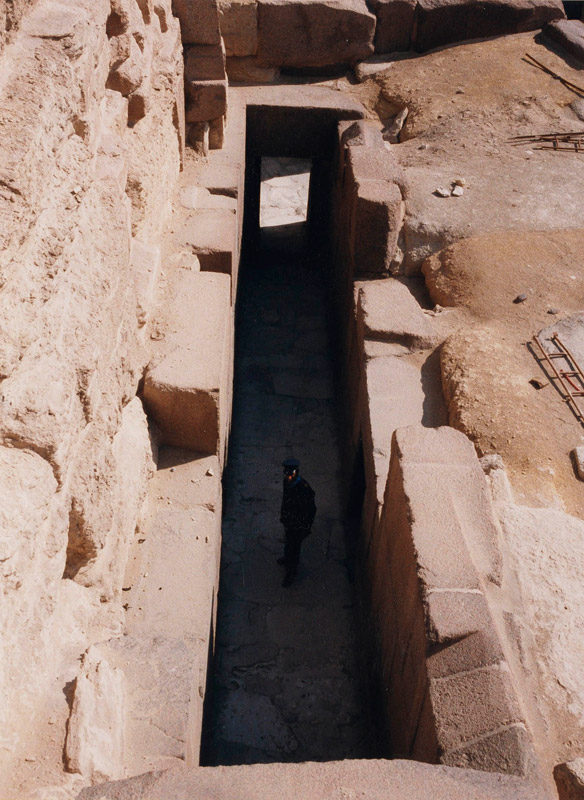
SUPPLEMENTARY PLATE 7-27. The Ascending Passage of the Valley Temple as seen from above, photo taken from the top of the west wall. This passage was originally covered, and in the foreground on the right may be seen the base of a slanting light-slit carved from the granite, to admit light into the passage in antiquity. The doorway opening onto the roof is at the far end of the passage on the left, where some granite blocks protrude. Today, one has to edge gingerly along the ledge in order to get to the other side of the Ascending Passage and thus gain access to the roof. Few people are prepared to risk it, and Ioannis hesitated for a long time before he allowed me to entice him to join me, and to make this bold gesture for science. However, it was only because he did so that we discovered from or dating results that the roof had been accessible during the New Kingdom period, while the rest of the structure was buried. SUPPLEMENTARY PLATE 7-28. 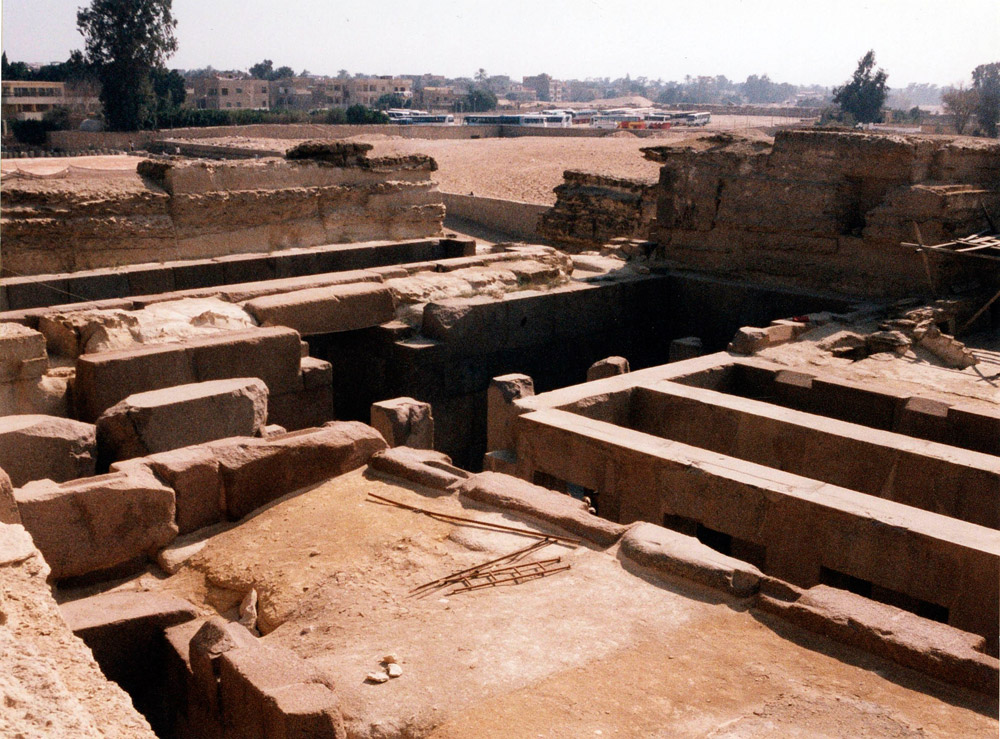
SUPPLEMENTARY PLATE 7-28. The roof of the Valley Temple, from the top of the north wall, looking towards the southeast. In the background is the village of Nazlett al-Sammann, a suburb now of Cairo (in Greek and Roman times it was called Busiris, and in pharaonic times it was called Djedu). At the bottom left may be seen the commencement of the Ascending Passage. In the middle of the photo, extending also to the right, is the T-shaped Pillared Hall. Beyond the stone barrier at the east lies (top left) a dark streak, which is the open top of the Anteroom. And beyond that is the massive limestone east wall. The southeast corner of the structure has a piece missing. At top right is a large and very thick portion of the limestone west wall which has no known function. SUPPLEMENTARY PLATE 7-30. 
SUPPLEMENTARY PLATE 7-30. I am standing on the portion of the Valley Temple roof which divides the Pillared Hall (at my feet) from the Anteroom (behind and below me). Directly behind me is the southeast corner of the south wall of the temple. To my left rises a high and thick section of limestone wall, the purpose of which is unknown. I believe that it contains a space which may be an empty chamber. Since the roof of the Valley Temple was accessible in New Kingdom times, it is doubtful that any such chamber would be intact from Old Kingdom times and now contain anything, though there are no apparent signs of entry. However, I did not climb up to the top to look down on this structure, to see whether there was an opening to a shaft or chamber, of the kind which I found elsewhere on the roof. (Photo by Olivia Temple) SUPPLEMENTARY PLATE 7-32. 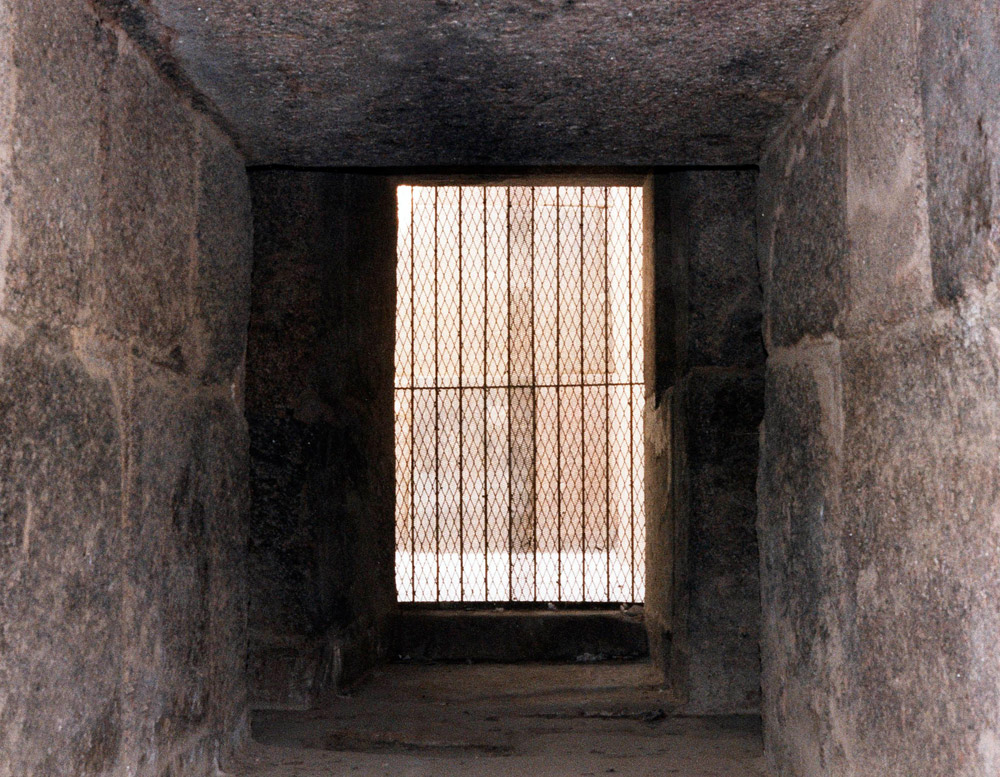
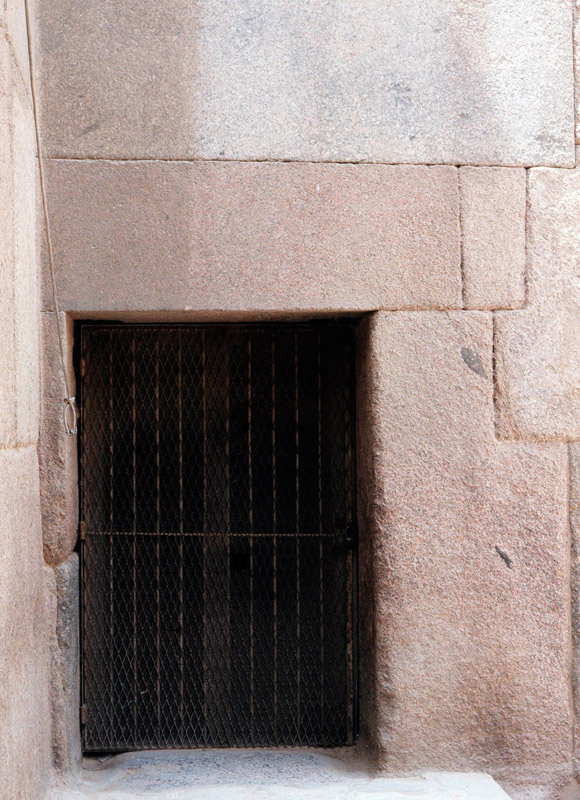
SUPPLEMENTARY PLATE 7-32. Interior view from the magazines (behind the camera) of the Valley Temple looking outwards. No one had been inside for so long that the key to this locked metal door had been lost, and the lock had to be smashed by the inspectors in order to get in. At upper right, a missing granite stone block shows the revealed entrance to the Blind Room at shoulder height, visible here only as a slightly paler vertical piece of stone (which is the side of the stone beyond). You have to climb up to get into it. SUPPLEMENTARY PLATE 7-35. 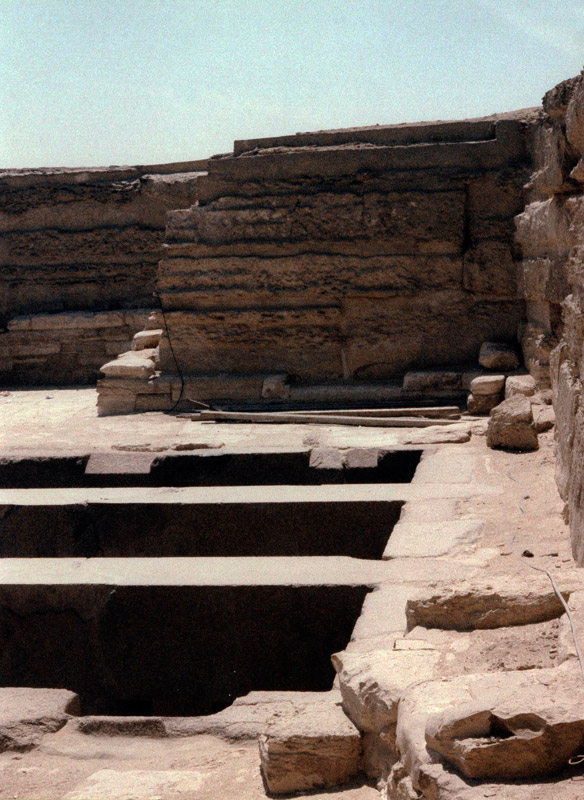
SUPPLEMENTARY PLATE 7-35. Looking south on the roof of the Valley Temple, at the far end, filling the southwest corner, is ‘the box’, - a square limestone structure which is ‘dead’, as is the section of the temple directly below it. I believe it contains another Blind Room, with a third Blind Room below it. It is possible that these rooms have been sealed since the time of the Old Kingdom, and that they contain sacred temple objects or gold statues. SUPPLEMENTARY PLATE 7-36. 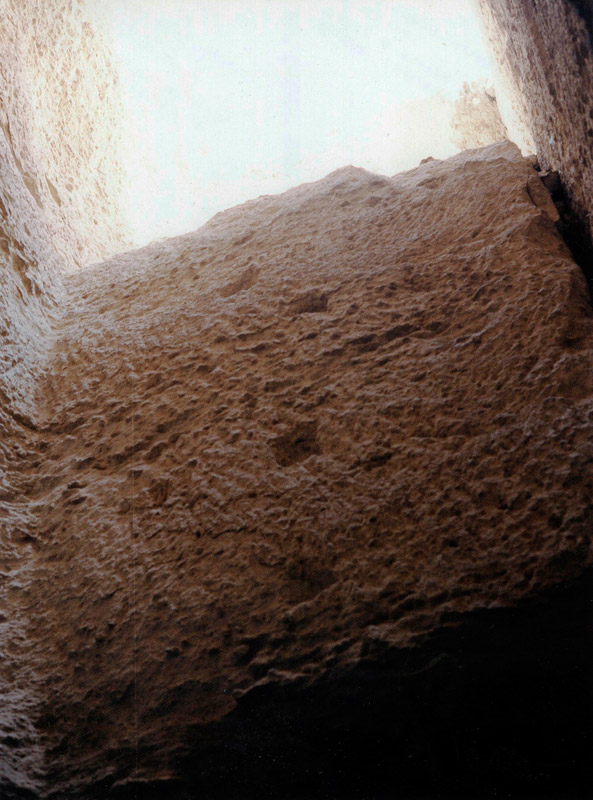
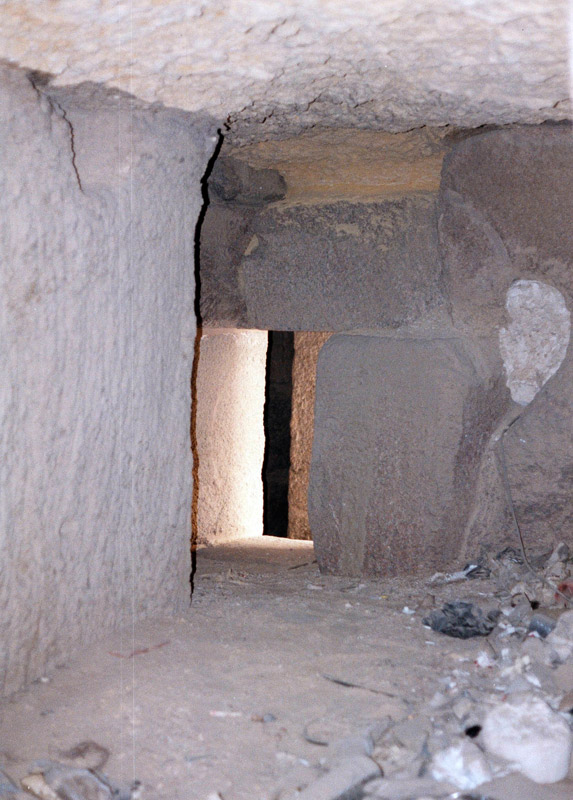
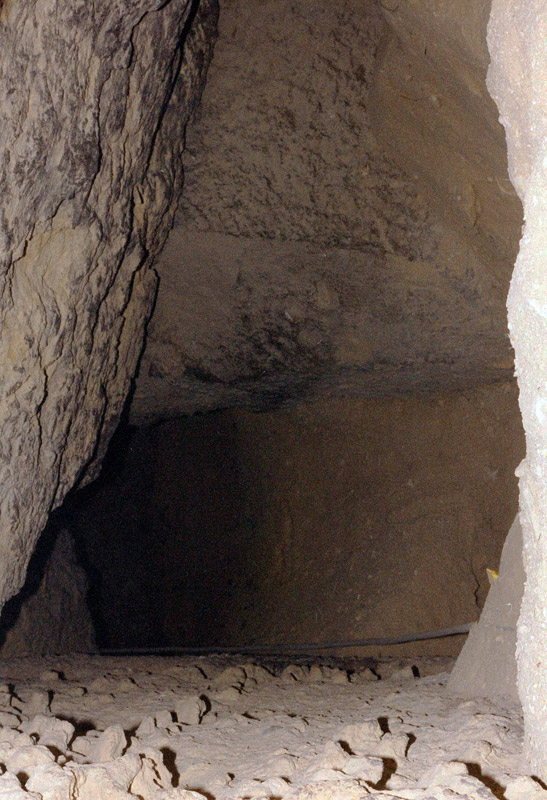
SUPPLEMENTARY PLATE 7-36. Looking up the south shaft from the Blind Room. The holes cut for the insertion of wooden beams, presumably to support a vertical stairway, are clearly visible. The huge central stone block stops short of the top of the shaft, and its upper surface forms a protruding ledge concealed within the shaft, presumably leading off to a side passage at that level. SUPPLEMENTARY PLATE 7-38. 
SUPPLEMENTARY PLATE 7-38. The roof of the Valley Temple seen from the eastern end. In the background on the right is the Pyramid of Chephren, and on the left the small Pyramid of Mycerinus. The massive western wall is well shown here. In the bottom right of that wall is the granite doorway of the Ascending Passage leading out onto the Chephren Causeway. To the right of that may be seen protruding the granite blocks framing the other doorway of the top of the stairway, leading onto the roof. In the mid-left of the photo is the top of the granite Pillared Hall. The strip of granite architraves running along the bottom of the photo is the top of the western wall of the Anteroom. SUPPLEMENTARY PLATE 7-39. 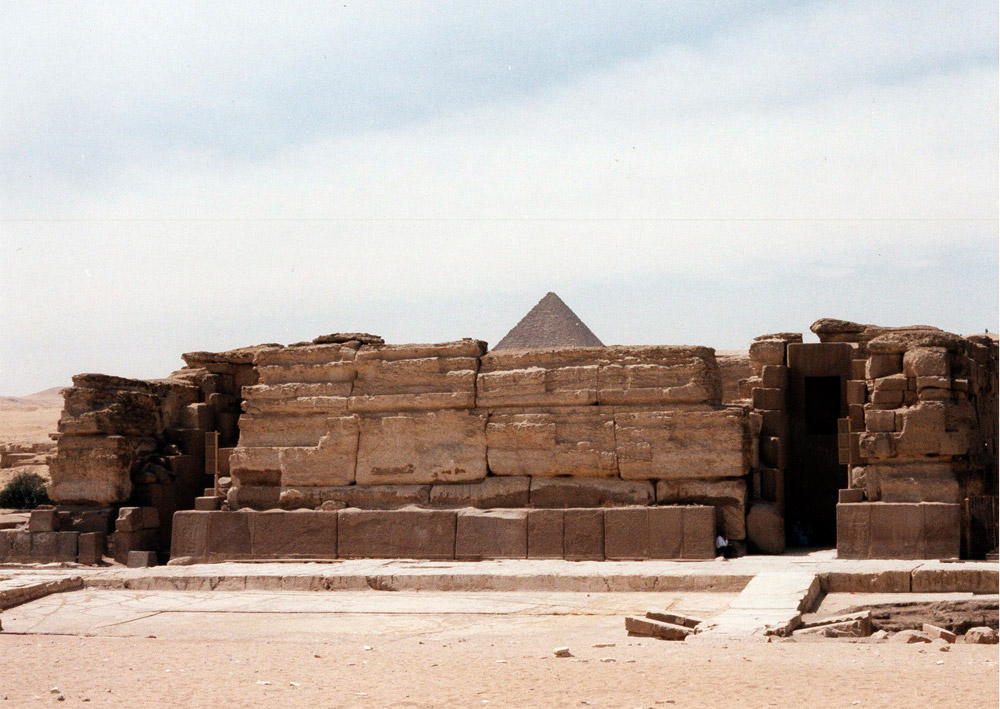
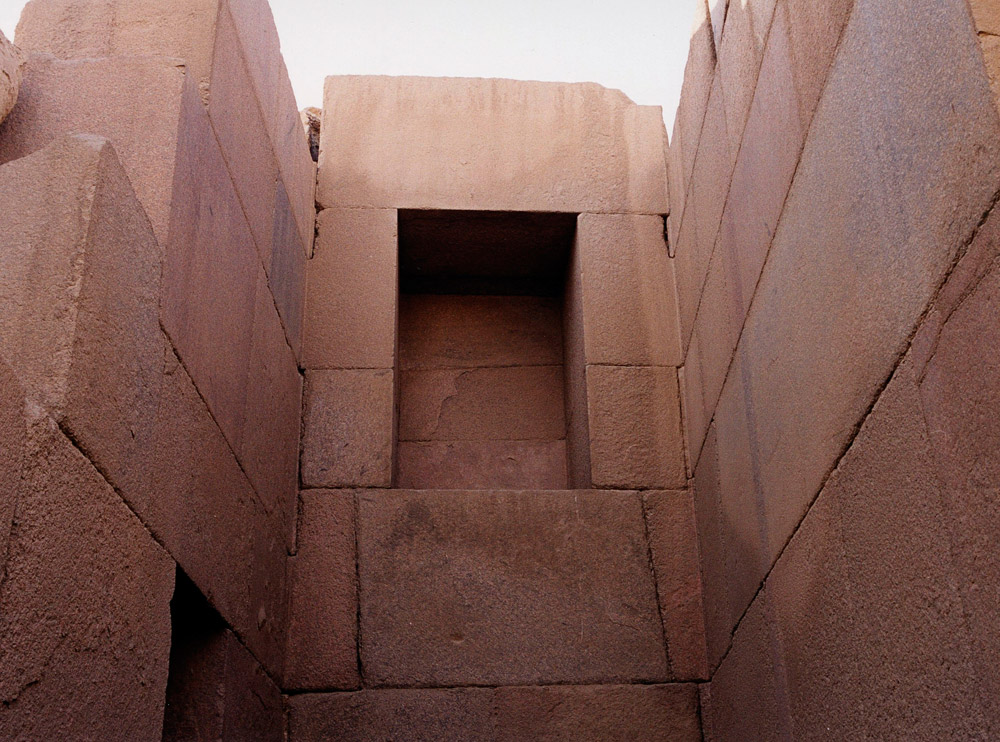
SUPPLEMENTARY PLATE 7-39. The eastern façade of the Valley Temple, with the top of the Pyramid of Mycerinus showing behind it. (In antiquity this would have created the curious optical illusion of a mini-pyramid, or pyramidion as they are called, resting on the roof of the temple.) On the right, the mysterious niche in the upper portion of the granite north entrance hall may be seen. Along the base of this eastern face of the temple a row of granite blocks remain from what was once granite cladding of the entire limestone wall (the limestone acting as a core masonry). The other granite blocks were removed by stone robbers, and probably the only reason why the bottom row remained was that those stones were so deeply buried in windblown sand or rubble that no one after the Old Kingdom priod knew they were there, or could reach them, until this façade was cleared in modern times. It is noticeable that the gigantic limestone blocks, weighing up to 100 tons each, are far more massive than the granite ones which once covered them. It is the limestone walls which contain most of the secret shafts, passages, and chambers in this structure, although the granite portions contain some (see Plate X). Leading directly into the north entrance hall is the north quay bridge, whereas to the far left of the photo the south quay bridge may just be seen, leading into the south entrance hall, which is not as well preserved as the northern one. The strange rectangular depression in the limestone pavement in front of the temple may be seen clearly here, at the bottom of the photo, and was possibly the gathering place for a large body of priests at a sacred festival (see text for a description of this festival, and how the construction plan would have been used for it). SUPPLEMENTARY PLATE 7-40. 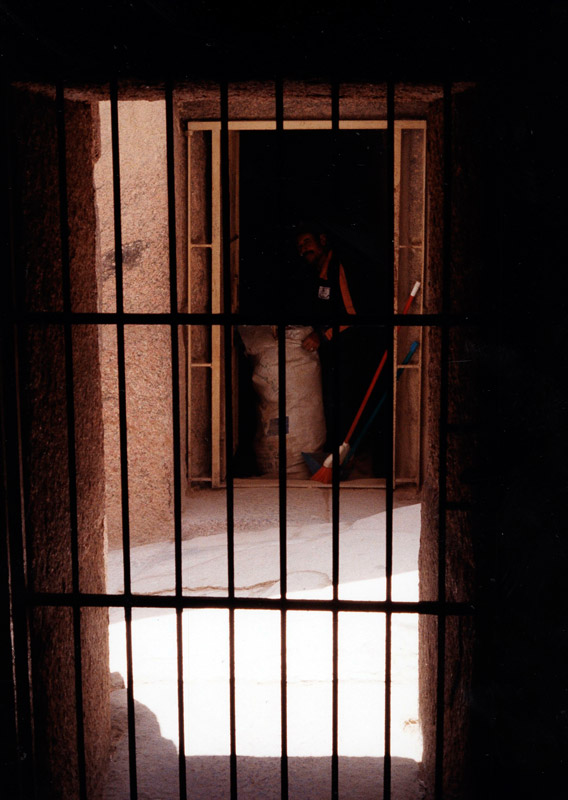
SUPPLEMENTARY PLATE 7-40. Looking outwards through the bars of the bottom of the stairway of the Valley Temple at the doorway opposite, which leads into the so-called ‘Porter’s Lodge’. A worker at our request has just filled a bag of rubbish from that chamber to allow us to clamber inside, as the rubbish had been so great that we could not get in. The Ascending Passage rises from left to right (east to west), to lead out onto the Chephren Causeway, between these two doors. SUPPLEMENTARY PLATE 7-41. 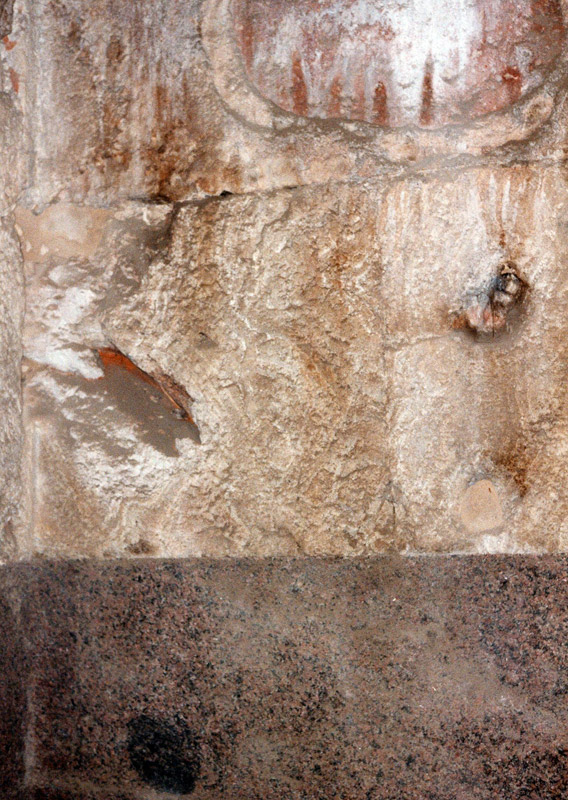
SUPPLEMENTARY PLATE 7-41. Inside the so-called ‘Porter’s Lodge’ in the Valley Temple, the walls are of red granite below and of ‘Egyptian alabaster’ (travertine) above. Here we see the southeast corner of the chamber. There are some strange patches in the alabaster portions of this chamber which have it been properly studied by anyone, and some are seen here. The granite portions of the walls more or less correspond to the ‘base’ of the chamber, if we do not take account of the Ascending Passage beside it, whereas the portions of the walls roughly corresponding to that are of alabaster. If the contrasting granite and alabaster were only for artistic effect, it is difficult to comprehend why the Egyptians would have bothered combining them in this tiny chamber. It may well be that the change of stone coinciding with the change of ‘level’ was intended to act as a signal or indicator. Since I believe that beyond the western wall of this chamber is another concealed chamber which has never been opened since the Old Kingdom, and it would be at ‘granite level’ but not at ‘alabaster level’, there may be a method rather than whimsy behind the use of the two stones for one tiny chamber. If so, we should re-examine the use of a double-stone casing for the Pyramid of Mycerinus, treating it as a similar clue as to some possible internal structure. (We know from early reports that only the bottom portion of that pyramid’s casing was of granite, whereas the top portion was of limestone, and it is therefore analogous in that sense to this chamber.) The floor of this chamber, which was once apparently of alabaster, has been largely ripped from this chamber, exposing a very irregular and lumpy floor beneath. This is very puzzling indeed, as it must have occurred at the end of the Old Kingdom and appears to have no normal motive. It is difficult to understand why this little chamber’s floor would have been removed by plunderers, whereas the much more extensive alabaster floors of the adjoining Ascending Passage and of the Pillared Hall were left untouched. In the case of such an anomaly, one can generally conclude that ‘there is something going on here’. It may well be that in antiquity some imprecise information suggested that this tiny chamber was adjacent to a concealed chamber, perhaps containing treasure, and that the ripping up of the floor was really a search for a subterranean shaft. If so, it lends support to my hypothesis of concealed chambers connected with this temple. SUPPLEMENTARY PLATE 7-43. 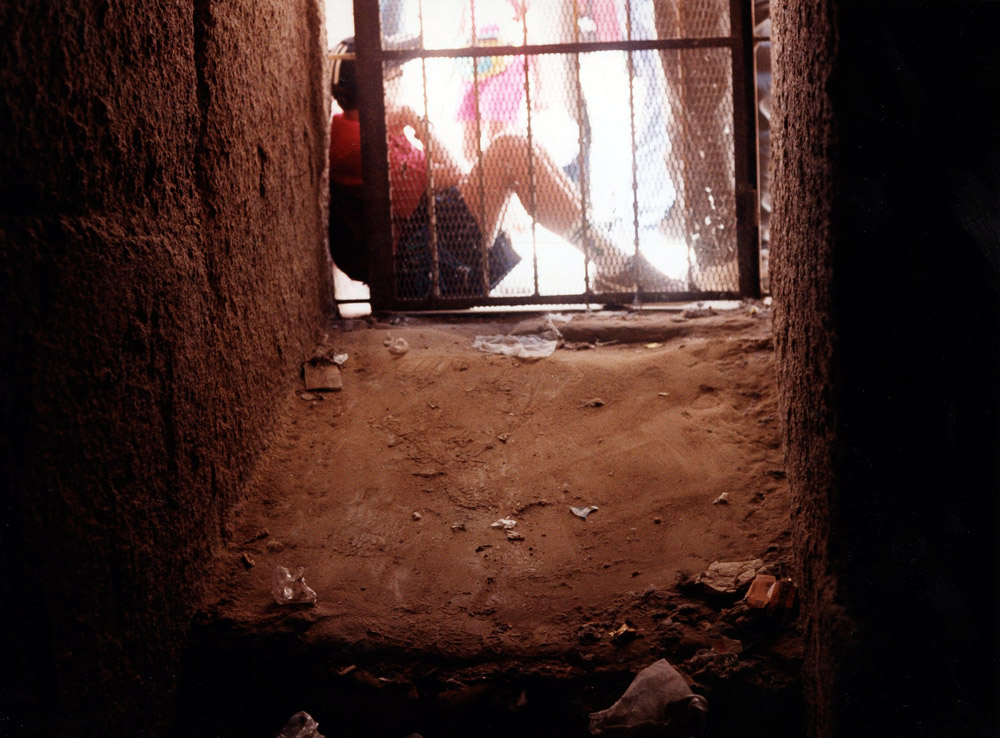
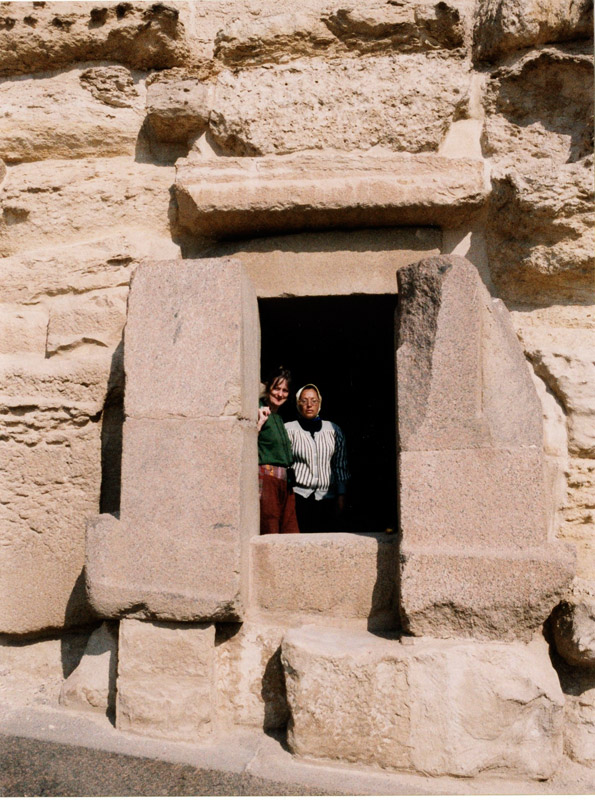
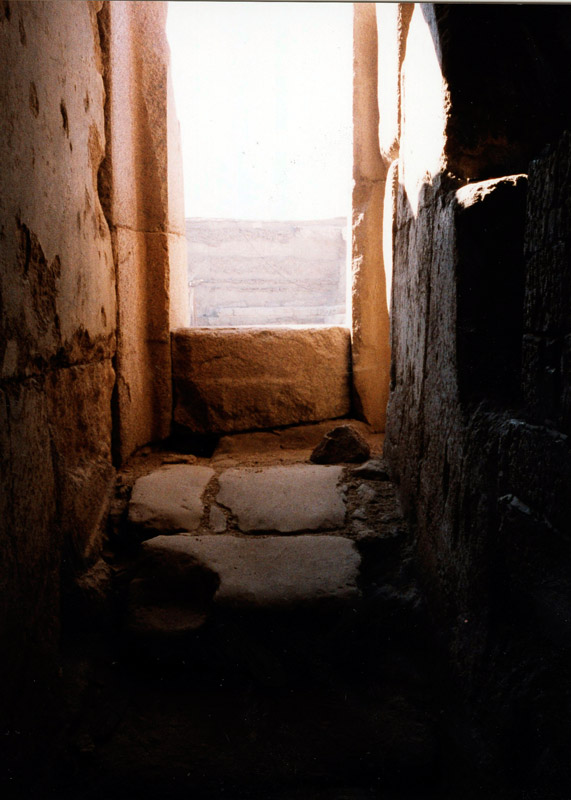
SUPPLEMENTARY PLATE 7-43. The sloping descent into the tiny chamber quaintly known as ‘the Porter’s Lodge’ in the Valley Temple, with a tourist sitting in the doorway. I had to clear mounds of rubbish and a great deal of windblown sand from this surface in order to see the configuration properly. It is extraordinary how steep this short incline is, and the chamber floor is lower still. This chamber appears to be grounded in the basic floor level of the temple, or not far above it, while the ramp of the Ascending Passage rises past and above it. I am convinced that there is a concealed chamber under the Ascending Passage, as I first pointed out in The Crystal Sun (2000). SUPPLEMENTARY PLATE 7-44. 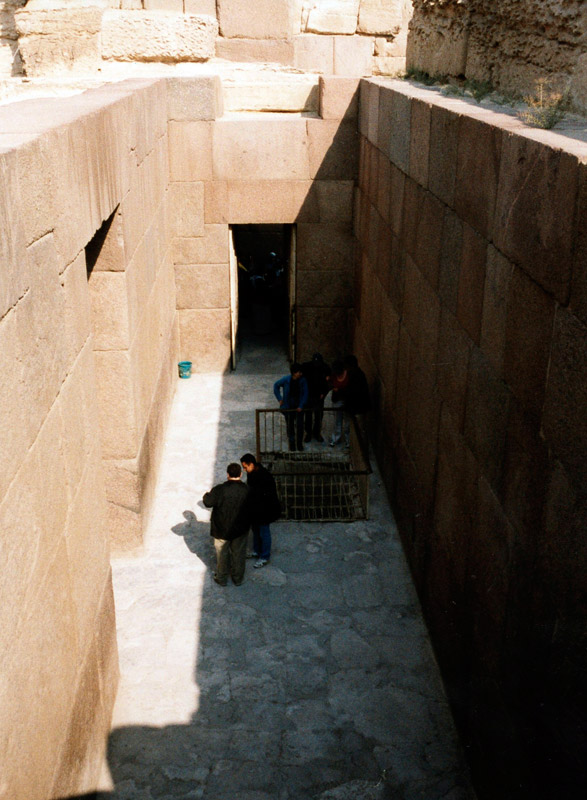
SUPPLEMENTARY PLATE 7-44. Looking down on the Anteroom of the Valley Temple from the southern portion of the roof. One enters the Anteroom through the granite doorway from the northern entrance hall (top end of photo). To the left is the granite doorway leading into the Pillared Hall. The rectangular fence in the floor surrounds the so-called ‘Well’, which was dug into the floor of the Anteroom after the time of its construction. In this ‘Well’ was found, upside down, the magnificent statue of Chephren (Plate X) which is now one of the most famous exhibits in the Egyptian Museum in Cairo. The so-called ‘Well’ may have been dug in order to conceal and save from destruction this and other statues at the time of the destruction of the temples when the Old Kingdom came to a drastic end with the chaos of the First Intermediate Period, when mobs are known to have rampaged through Giza smashing the statues of Chephren. SUPPLEMENTARY PLATE 7-45. 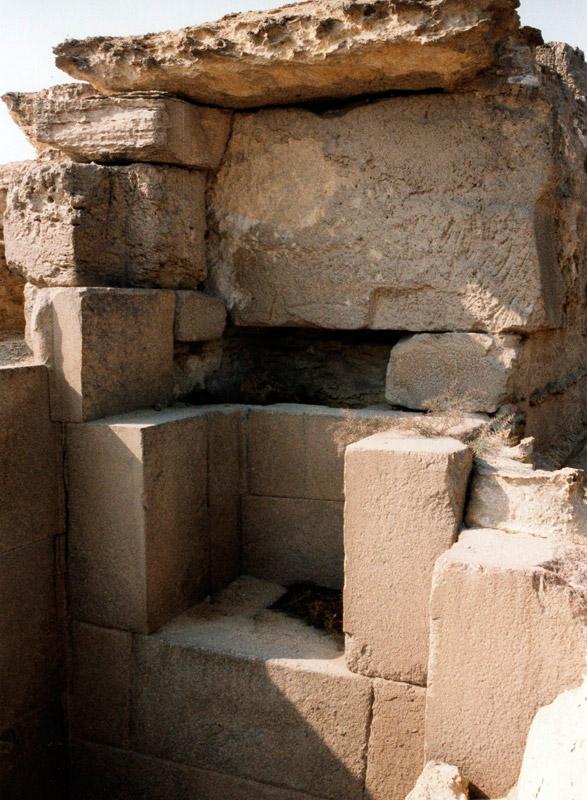
SUPPLEMENTARY PLATE 7-45. A close view of the now incomplete granite niche at the southern end of the southern entrance hall of the Valley Temple. The top blocks and the lintel have fallen off and were doubtless amongst the granite blocks blown up by dynamite in the 19th century by Auguste Mariette (see text). This photo gives a good idea of how the granite blocks were laid as cladding against the underlying limestone masonry. The blocks in the top half of the photo are all limestone and would have been covered over by granite in antiquity. They are part of the massive southern wall of the temple. SUPPLEMENTARY PLATE 7-47. 
SUPPLEMENTARY PLATE 7-47. A closeup of the red granite masonry at the top of the Ascending Passage of the Valley Temple, at the northwest corner. The dark patch to the left is the opening of the doorway onto the Causeway which leads up to the Pyramid of Chephren (and the granite block above it is the lintel). The interesting feature about this photo is the way the top granite block (on the right of the photo) has been cut to descend at the angle of slope of the passage. SUPPLEMENTARY PLATE 7-49. 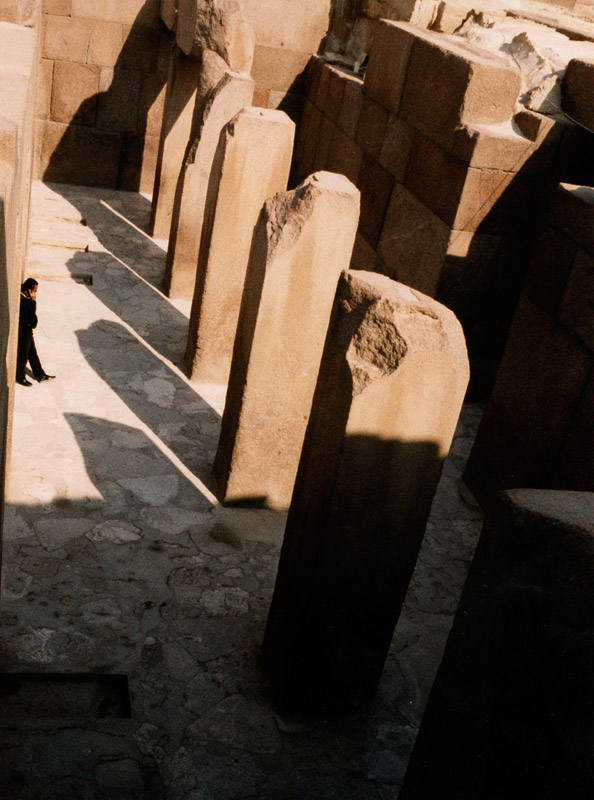
SUPPLEMENTARY PLATE 7-49. The eastern end of the Pillared Hall of the Valley Temple, seen from the roof. The missing granite architraves had fallen or been pushed to the ground, where they were found when the temple was cleared by Auguste Mariette in 1853. Since he could not carry them away or put them back, he dynamited them to bits and swept away the pieces! Such was the vandalism of the early excavators! SUPPLEMENTARY PLATE 7-50. 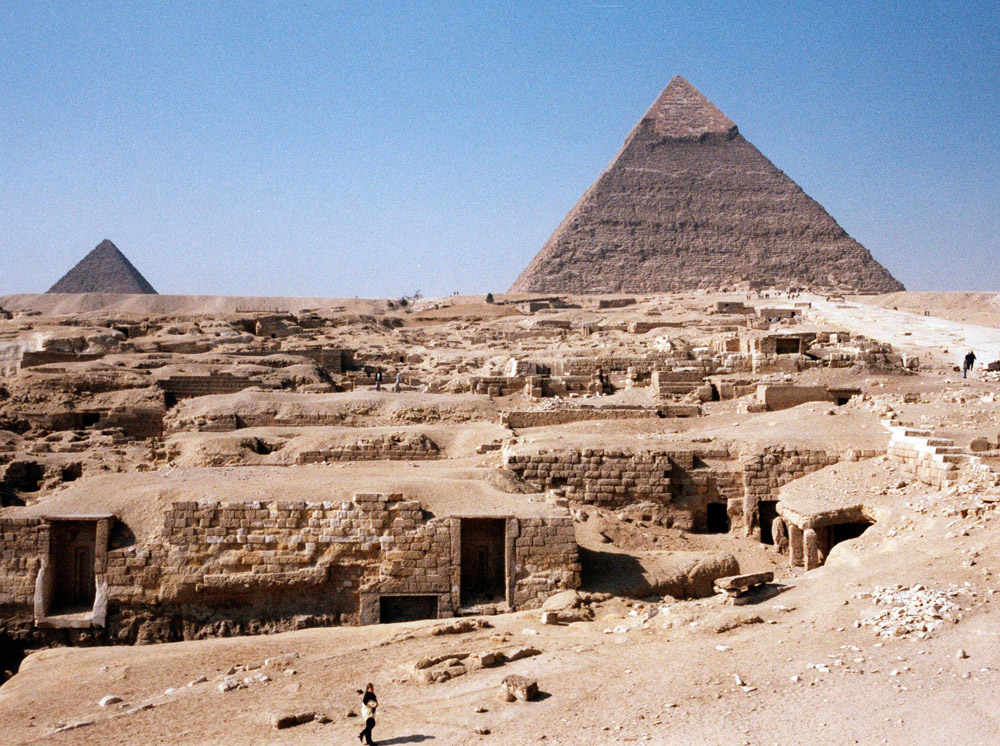
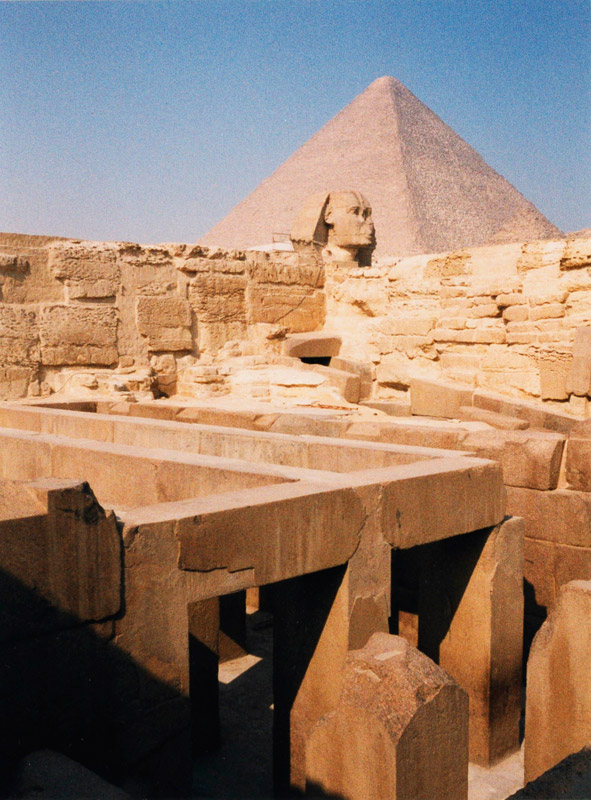
SUPPLEMENTARY PLATE 7-50. A view no one ever sees: the tombs of Giza as seen from the southwest corner of the roof of the Valley Temple, looking west. The Pyramid of Chephren is on the right, and in the distance on the left is the Pyramid of Mycerinus. The Chephren Causeway may be glimpsed on the far right leading up to the pyramid. Olivia is strolling in the foreground. SUPPLEMENTARY PLATE 7-52. 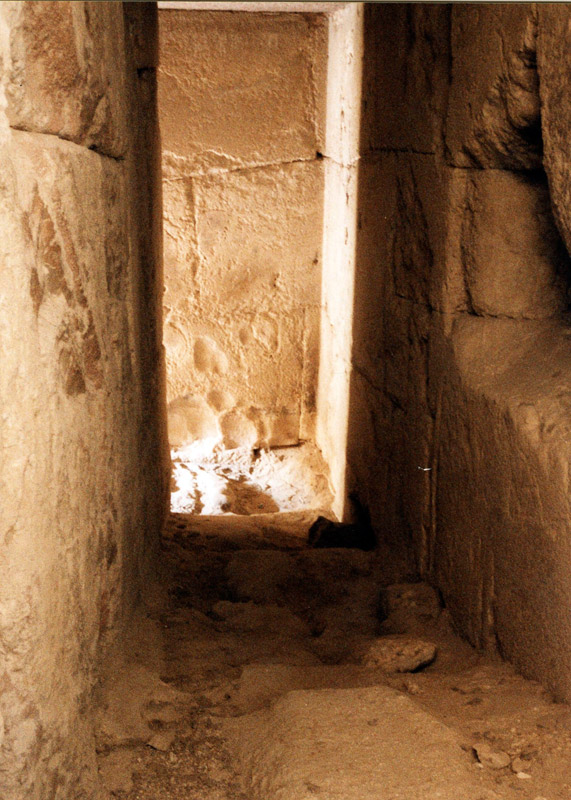
SUPPLEMENTARY PLATE 7-52. The stairway inside the Valley Temple which leads to the roof. Although it appears to be made of limestone blocks, if you press a light against the stones they are vividly translucent, and a powerful glow spreads for a considerable distance. This demonstrates that the blocks are really of travertine, ‘Egyptian alabaster’, and not of opaque limestone. If you turn left at the bottom, a small door opens into the Ascending Passage on its north side. If you continue up beyond the camera and turn right, a small door leads onto the roof (see Plates X and X) SUPPLEMENTARY PLATE 7-54. 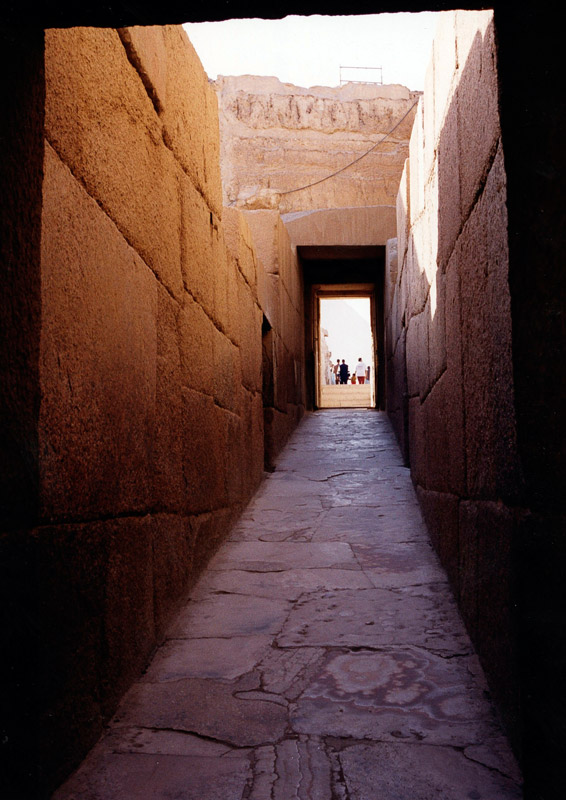
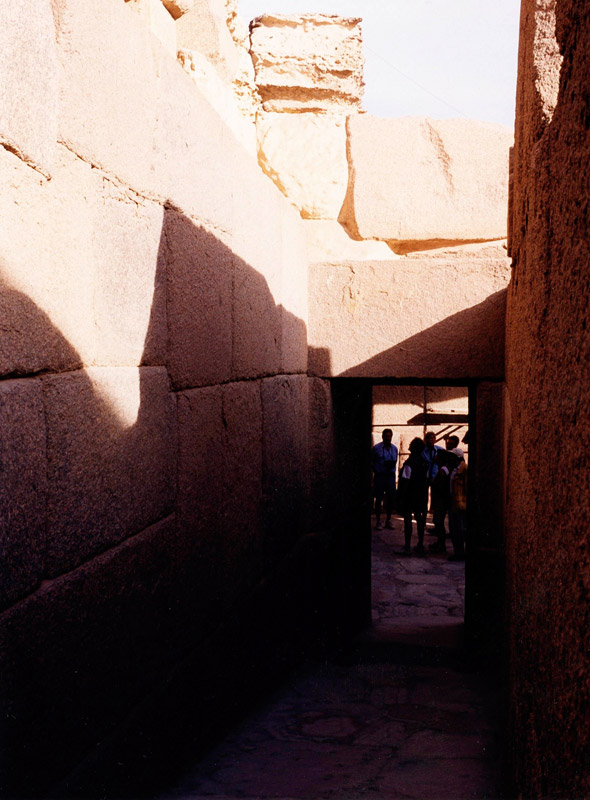
SUPPLEMENTARY PLATE 7-54. The Ascending Passage rising up at the ‘golden angle’ of 26° 34’ and leading out of the Valley Temple onto the Chephren Causeway. This passage’s slope, which I seem to be the first person to bother to measure, is the same as that of the Ascending Passage and the Descending Passage inside the Great Pyramid, as I mentioned in an earlier book, The Crystal Sun (2000). This angle is uniquely connected with the ‘Golden Section’, which lay at the basis of all Egyptian art and architectural design. The passage floor is made of travertine (‘Egyptian alabaster’), which is translucent. The walls are of red granite. The doorway glimpsed on the left leads into the small chamber which was given the silly name of ‘the Porter’s Lodge’ by Uvo Hölscher. SUPPLEMENTARY PLATE 7-55. 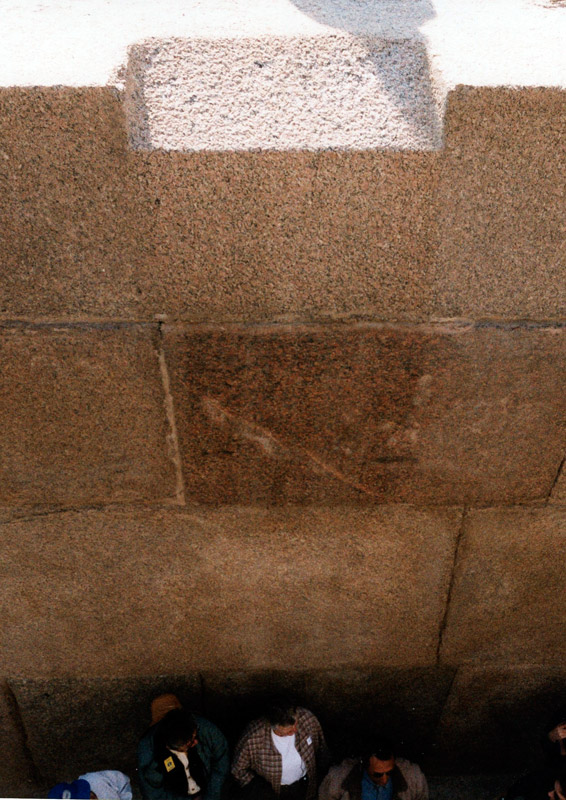
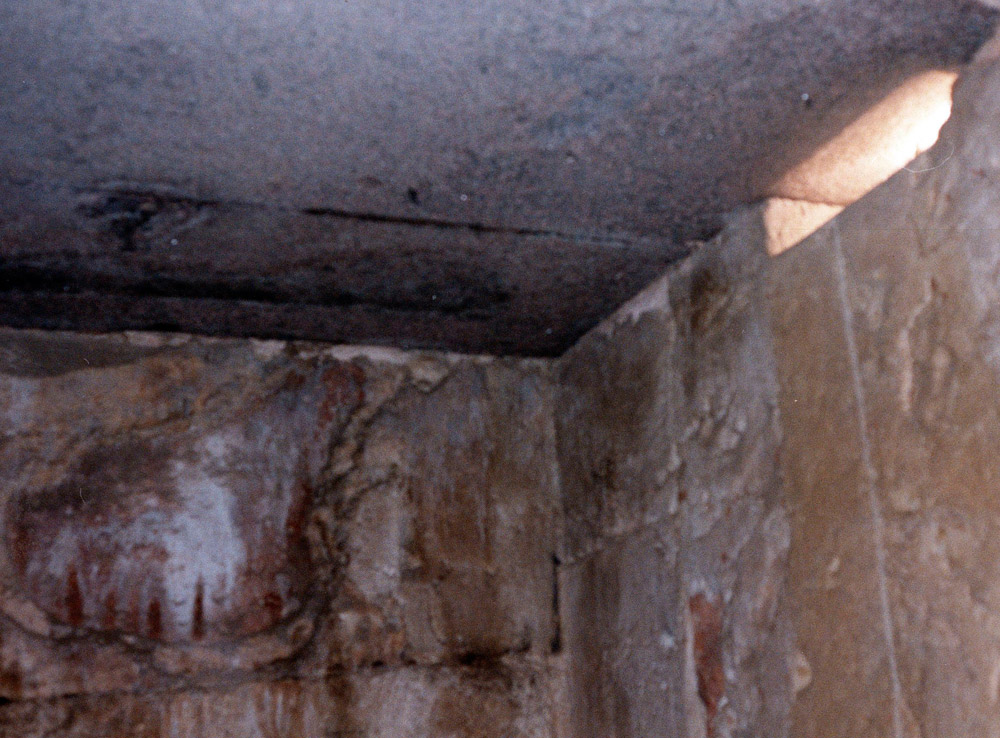
SUPPLEMENTARY PLATE 7-55. The Pillared Hall of the Valley Temple had a ceiling in antiquity, and the otherwise dark hall was lit by a series of slits cut in the granite above, acting as light shafts. At the top of this photo, the angle of the cut stone shows the light slit very clearly, by contrast with the rest of the stone. SUPPLEMENTARY PLATE 7-57. 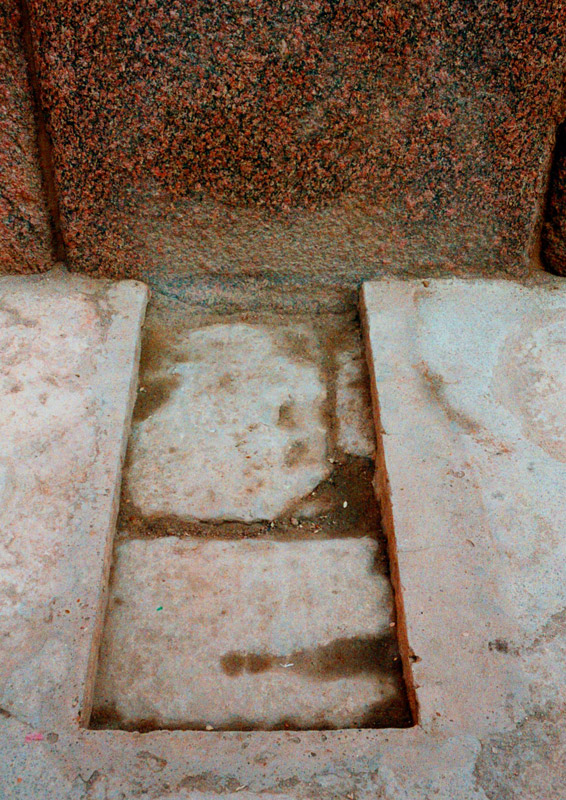
SUPPLEMENTARY PLATE 7-57. Here we can see clearly that the thin alabaster floor of the pillared hall of the Valley Temple was laid subsequently to the erection of the interior granite walls and pillars, as it is pressed up against the granite as a later addition. The rectangular depression in the centre of the photo is one of the many holes described by Hölscher as ‘statue bases’. Although the presumption that these holes (see also Plate 7-13) are bases for statues of Chephren is probably correct, the question arises as to whether they were truly original features of the Valley Temple, or whether they are additions originating during a refurbishment of the temple after Chephren usurped it in order to convert it for use in connection with his own funerary cult. The clear evidence of the laying of the floor in the manner shown could mean either a mere sequential process of construction, or it could represent an adaptation of the floor by putting an alabaster layer over the existing limestone floor which we see here beneath it, to enable statue bases to be created. SUPPLEMENTARY PLATE 7-58. 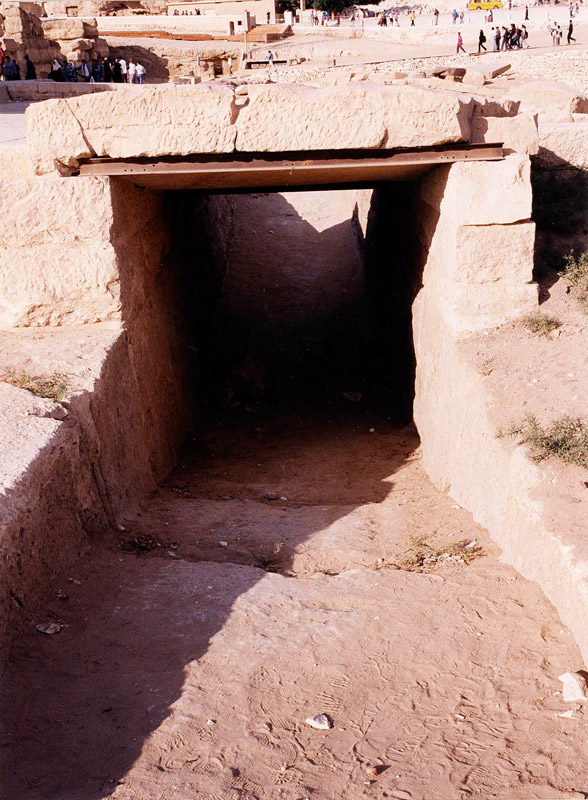
SUPPLEMENTARY PLATE 7-58. A close-up of one of the two little bridges with descending and ascending ramps beneath them, which are such a prominent feature of the ‘quay’ in front of the Valley Temple at Giza. The stones over the bridge have been reinforced with modern steel so that tourists can safely pass over them. The only possible explanation for these peculiar constructions seems to be in connection with a purification ritual of passing down and emerging from a pool of water as part of a procession, possibly part of the famous Festival of Sokar, which was the major ceremony associated with the Old Kingdom period at Giza. The processions would have gone down one ramp, passed under the bridge and through a pool of water, and gone up the opposite ramp (see description of s possible reconstruction of this part of the ceremony in the main text). SUPPLEMENTARY PLATE 7-60. 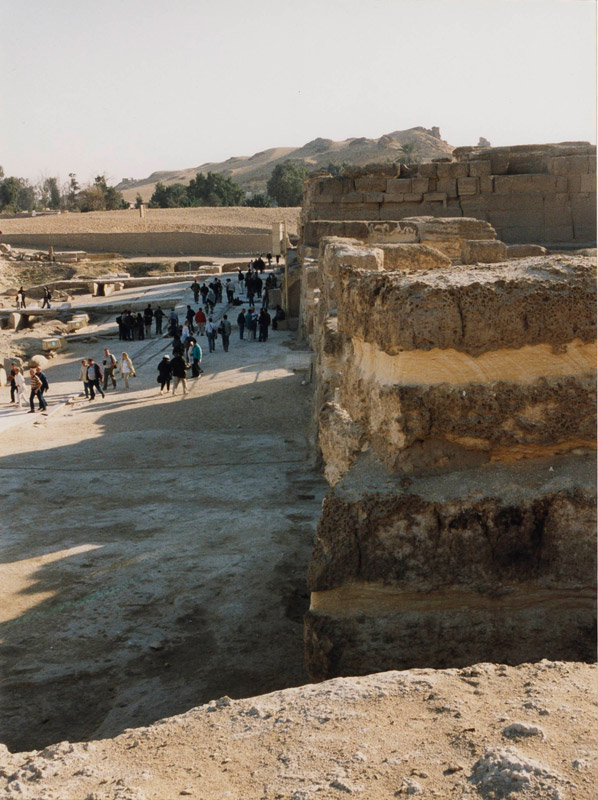
SUPPLEMENTARY PLATE 7-60. A photo shooting along the north-south line of the eastern facades of the adjoining Sphinx Temple (right) and Valley Temple (beyond, the higher blocks in the distance). This photo is taken from the top of the bluff overlooking the North Trench (between the bluff and the wall in the foreground on the right). For detailed discussion of the alignment, see the text. In the upper left of this photo, opposite the front of the Valley Temple, may be seen the two small quay bridges spanning the former pools of water (see Plates X, X, and X). SUPPLEMENTARY PLATE 7-61. 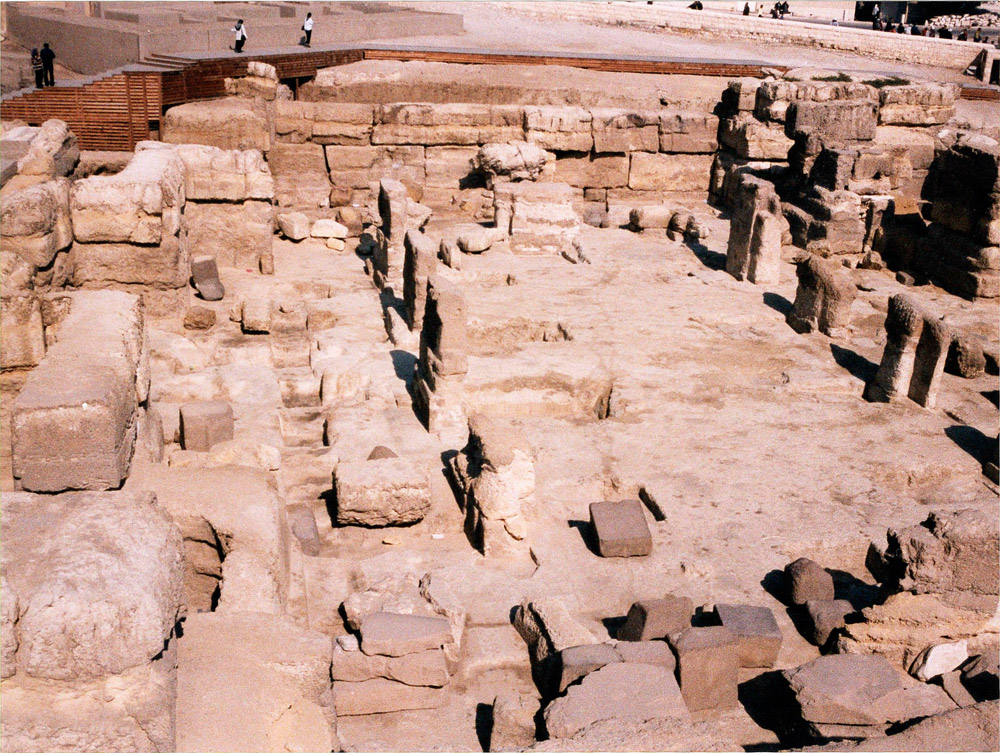
SUPPLEMENTARY PLATE 7-61. The Sphinx Temple, looking north, seen from the top of the north wall of the Valley Temple. At the top of the photo is the modern wooden gangway constructed to allow access (with special permission) to the Sphinx Pit. To the left, the massive blocks of the western wall of the temple, which would have acted as such an effective barrier to prevent the water in the Sphinx Moat (described at great length in my previous book The Sphinx Mystery) from pouring towards the lower slopes of the east, or from entering the temple at the Sphinx’s feet. The lower portions of this wall are carved from the bedrock itself. It was obviously impossible to allow there to be any exit from the temple at this point into the Moat, which explains why no door ever existed in this wall. No one had previously been able to explain why a temple sitting directly in front of the Sphinx does not connect with the Sphinx, and allows no access to it. SUPPLEMENTARY PLATE 7-62. 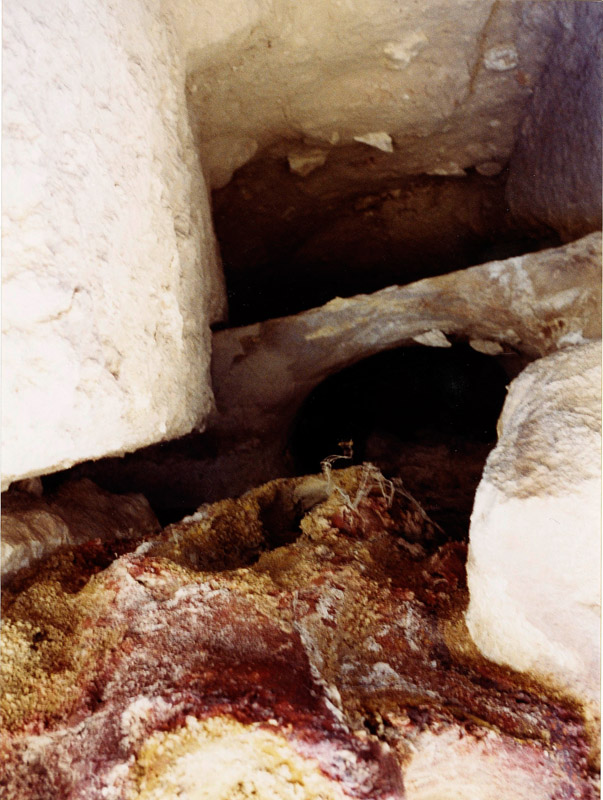
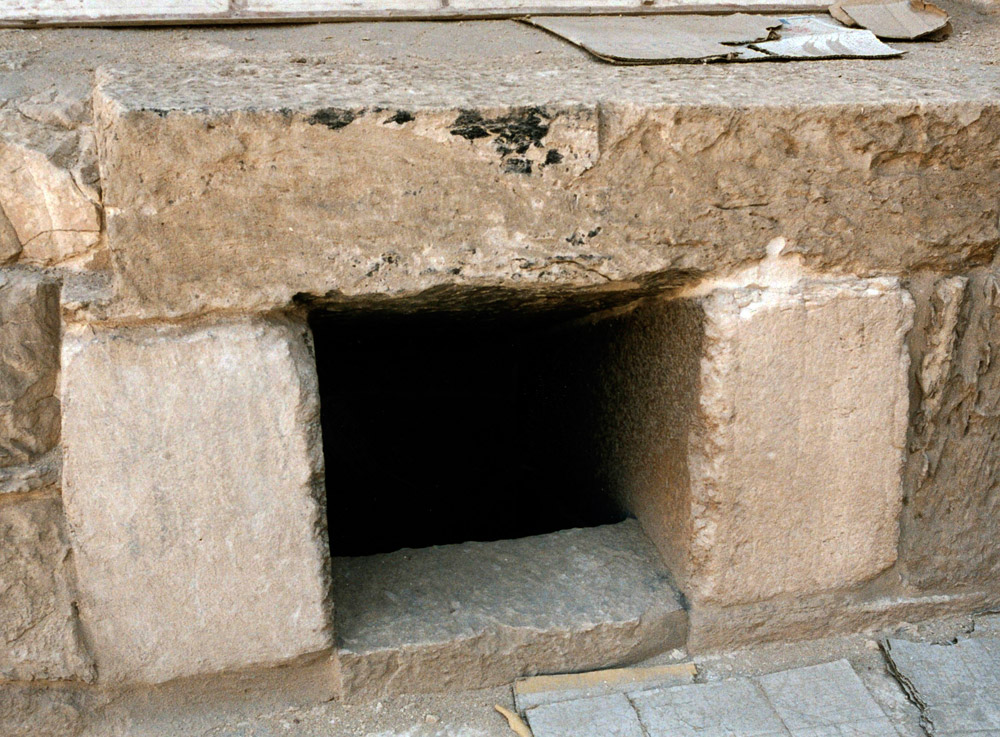
SUPPLEMENTARY PLATE 7-62. A closeup of the very strange hole opening into the southern so-called ‘water drainage channel’ in the Sphinx Temple. The massive limestone block lying on top makes access and proper inspection of this channel difficult for anyone larger than a rodent, and although I know some people who might qualify for that description, I would not trust their judgement. The bizarre red, white, and yellow mineral encrustations here are puzzling, and I cannot explain them. I looked at them as closely as I could, and the more closely I looked the more puzzled I became. They seem to be bubbling up from something, with layers of encrustation being successively deposited on top of earlier layers. Perhaps the ‘efflux of Osiris’ is leaking upwards! SUPPLEMENTARY PLATE 7-64. 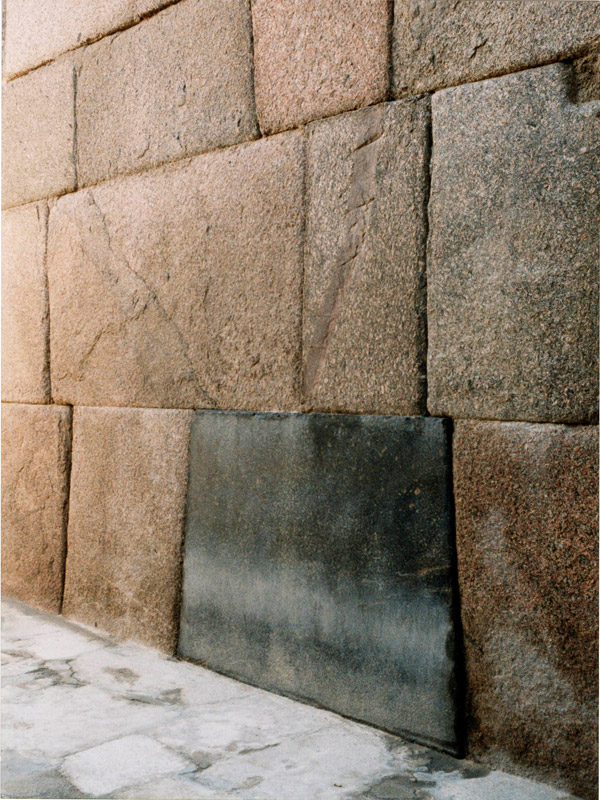
SUPPLEMENTARY PLATE 7-64. The inner side of the east wall of the Anteroom of the Valley Temple. This wall is composed entirely of blocks of red granite, with the prominent exception of this strange block of black granite of basalt, which has been inserted at floor level as if to call attention to itself. We know from dramatic examples in the Great Pyramid and elsewhere that the occurrence of such anomalous blocks was often intended as a secret indicator of the location of a concealed chamber or passage. Here, it might perhaps signal something beneath the floor. Only a few feet to the left (north), treasure hunters at the time of the destruction of the temple are believed to have dug the ‘Well’ in this same floor. It was into the ‘Well’ that they threw one of the world’s most famous statues, the huge seated figure of Chephren with the wings of Horus wrapped protectively around his head. It is now one of the chief exhibits in the Egyptian Museum in Cairo. It was discovered there in the 19th century. It is more likely, in fact, that the priests hurriedly dug the ‘Well’ to save one of their favourite statues from destruction by the mobs who were smashing everything in sight at Giza at the end of the Old Kingdom, when law and order totally collapsed. As for treasure seekers, perhaps they should learn to recognise the signals. Anyone who dug at the foot of this black block might find something beneath the alabaster floor which would be really surprising. Alternatively, this might have been an entry point to one of the secret passages which riddle these walls, as shown in other photos. I have not actually been inside the east wall of this temple as I have in the north and south walls, and although I am certain this wall contains at least one passage, it is much more carefully concealed than usual, and the basalt block may be an indicator of something really important. I would not be at all surprised if a chamber or passage exists inside this east wall which has not been entered for four thousand years. SUPPLEMENTARY PLATE 7-65. 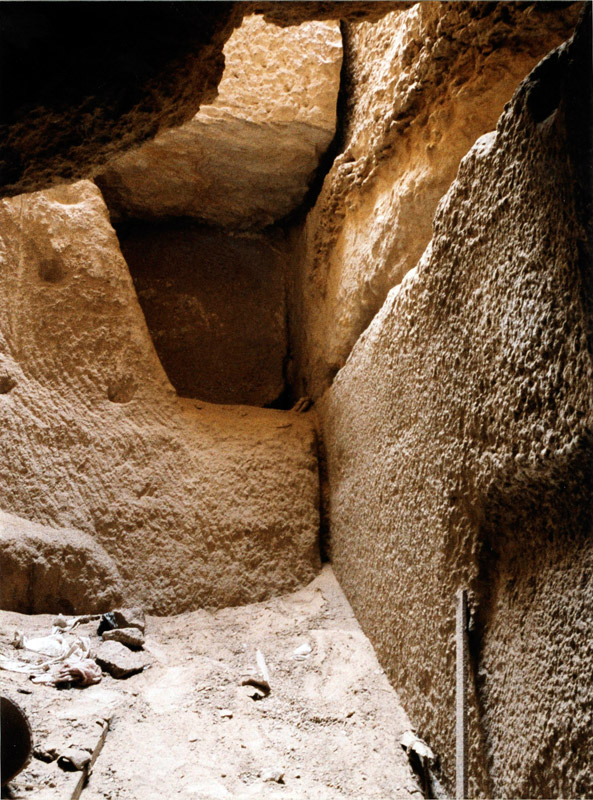
SUPPLEMENTARY PLATE 7-65. Standing in the Blind Room of the Valley Temple, near the base of the vertical shaft in the south wall, looking east. A granite block, seen here in the centre of the photo in the distance, seems to have been put into place within the limestone wall to block the passage leading east within the wall, perhaps to seal a chamber at that point concealed within the wall on the other side of the granite block. If the south wall is similar to the north wall, this blocked passage must have connected to the next vertical shaft, but there is no entry to or sign of the next vertical shaft at roof level. The huge effort put into sealing this passage off with granite is suspicious, as is the obscuring of the vertical shaft from the top. One wonders what the ancients were concealing here. Indeed, what could still lurk behind this stone? SUPPLEMENTARY PLATE 7-66. 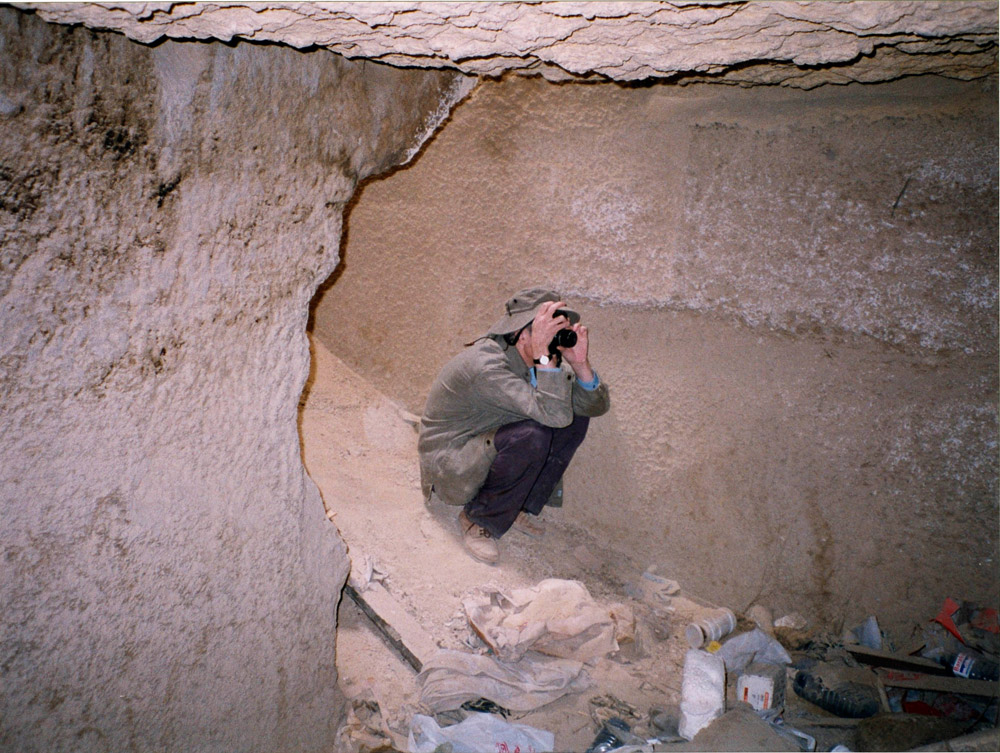
SUPPLEMENTARY PLATE 7-66. Crouching on some windblown sand at the far (southern) end of the Blind Room in the Valley Temple. Behind me is the base of the vertical shaft in the south wall of the temple (see Plates 7-65 and 7-67). The Blind Room is filled with large quantities of modern rubbish, much of which I cleared into a corner. The thick wall at left apparently contains another sealed chamber, because there is a small drain at ground level constructed in the south wall of the passage leading to the magazines, from which a strange, apparently acid, fluid drained in antiquity and ate away at the stone floor (see Plate X). It must have come from whatever is in the sealed chamber behind this wall. SUPPLEMENTARY PLATE 7-67. 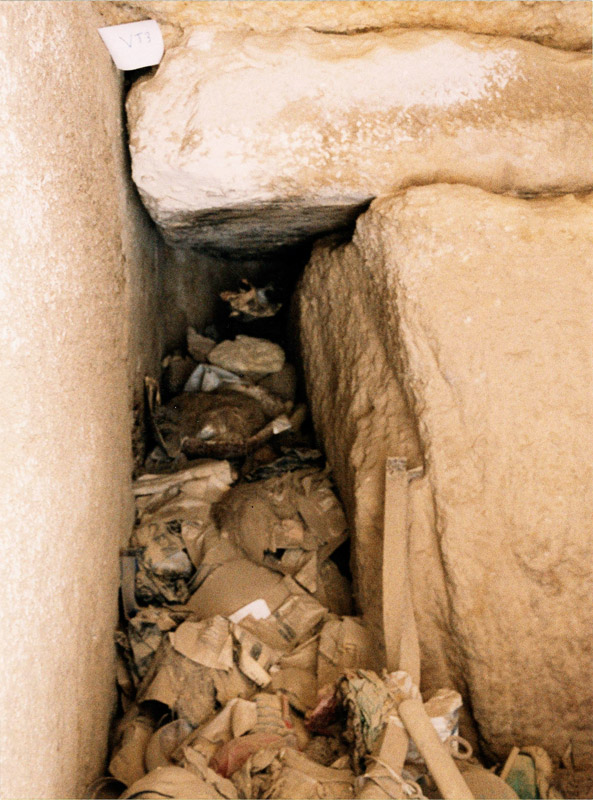
SUPPLEMENTARY PLATE 7-67. Inside the Blind Room of the Valley Temple there is the beginning of this passage leading west inside the temple wall. I pushed all the rubbish littering the chamber into the passage in order to clear the main floor space. Unfortunately, I did not think to take a photo of the passage before I did so. A proper investigation should be made of this little passage, as it probably leads to the next vertical shaft in the south wall, or to chambers beyond. A clearance, not only of the rubbish, but of the windblown sand, would be necessary before any such examination could be possible. I was unable to carry out any exploration of the passage because of my inability to clear the sand. The sign for our dating sample VT-3 at top left was of an unsuccessful attempt to date the Blind Room. The sample for the join between the two stones at that point turned out to be from a spot which had been damaged and could yield no data. SUPPLEMENTARY PLATE 7-68. 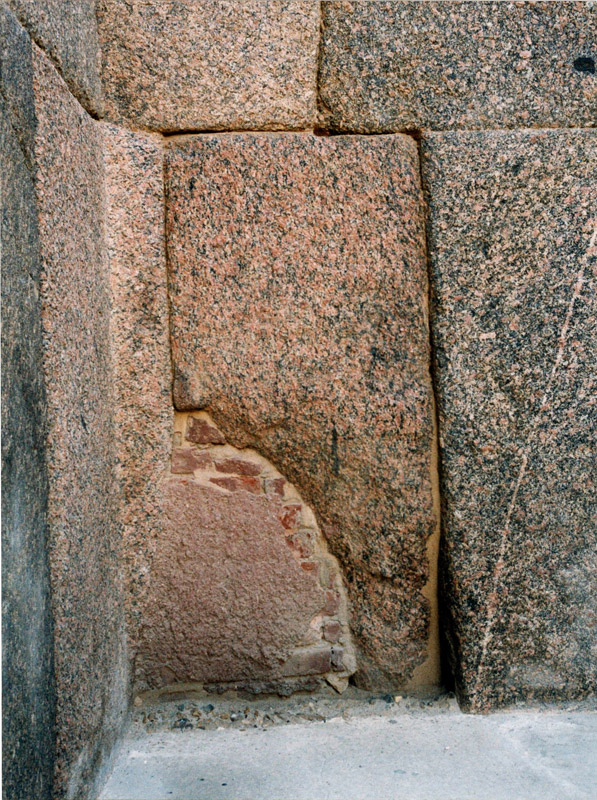
SUPPLEMENTARY PLATE 7-68. A large modern brick and cement patch in the granite masonry of the interior of the Valley Temple at Giza. The hole was probably made by treasure seekers, either in remote antiquity or in the 19th century. Unfortunately, such touching-up of ancient monuments to make things neat for tourist visitors often obscures important evidence. Unless we were to remove the patch and look into the hole, we will never know whether it leads to yet another of the many passages, shafts, and chambers which riddle the building, or whether it was simply a dead end. SUPPLEMENTARY PLATE 7-70. 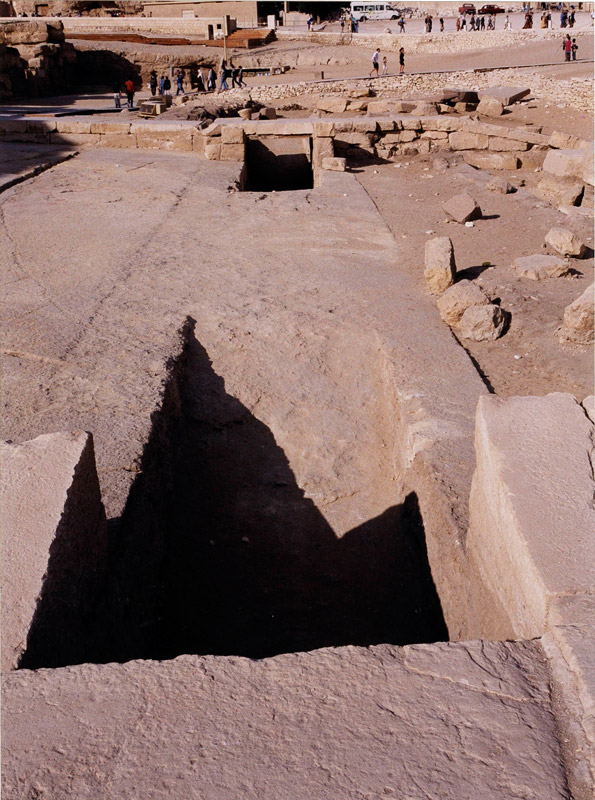
SUPPLEMENTARY PLATE 7-70. Another view of the strange bridges, ramps, and presumed ‘purifying pools’ of the ‘quay’ in front of the Valley Temple. Here we see how the ramps have been carefully cut out of the bedrock while the bridges have been laid over them as limestone blocks. The ramps would have been cut during the nine months when this area was dry, as for the three months of the Inundation period during the Old Kingdom, the flooded Nile covered this spot. It retreating waters at the end of that time would have left pools of water trapped beneath the two bridges. SUPPLEMENTARY PLATE 7-73. 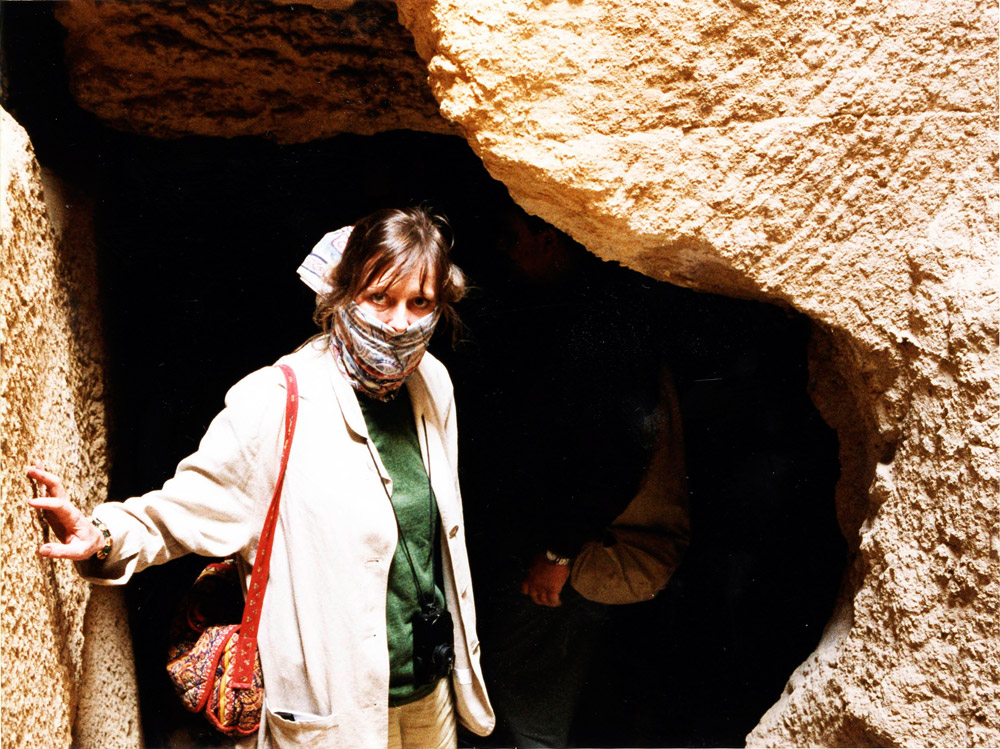
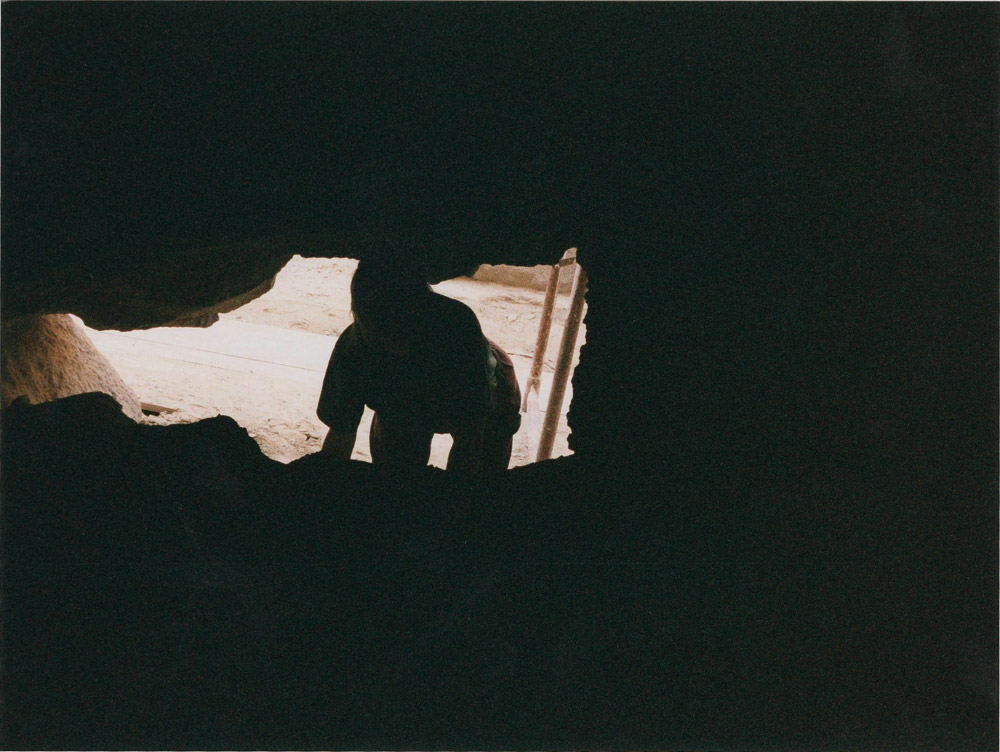
SUPPLEMENTARY PLATE 7-73. Olivia is wearing a scarf as a dust mask and standing in the entrance to a chamber at the base of the north wall of the Valley Temple. I crawled a long way on my belly into this void, and it led to an interior concealed passage connecting two vertical shafts inside the wall to one another at ground level. There is no doubt that all four of the outer walls of the Valley Temple are riddled with such connecting passages, networks of chambers, and vertical shafts. The entire structure is honeycombed with a secret internal structure. SUPPLEMENTARY PLATE 7-74. 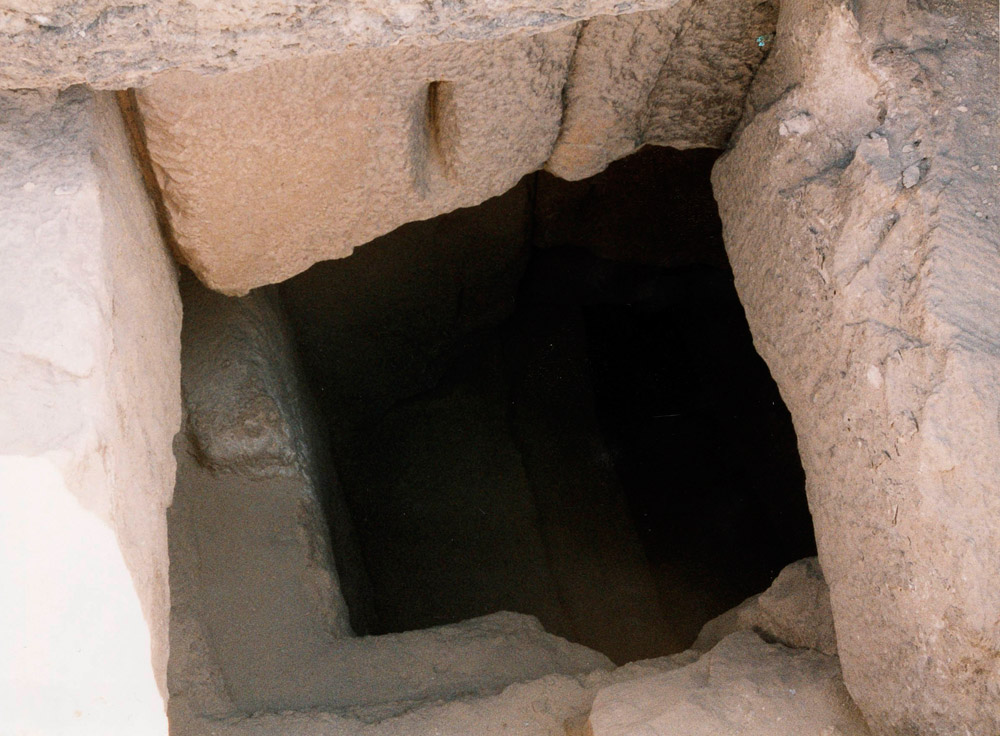
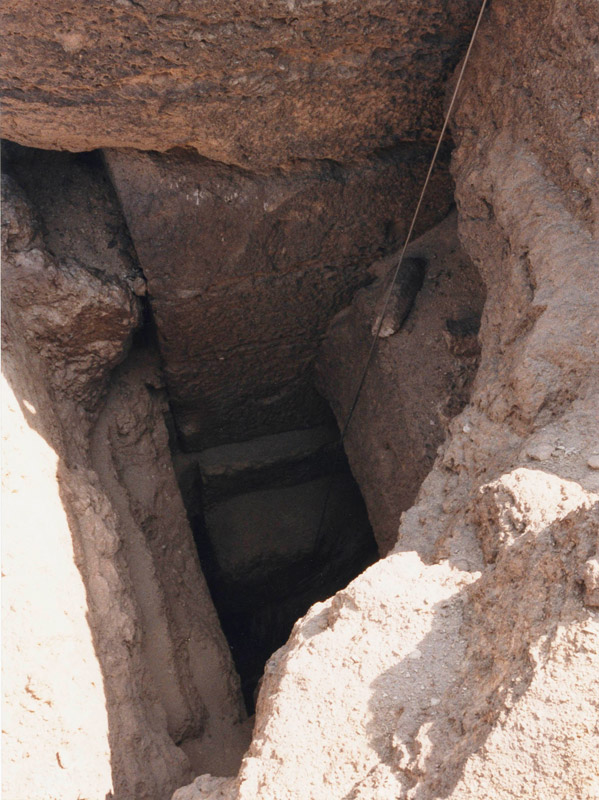
SUPPLEMENTARY PLATE 7-74. Another view down the first vertical shaft in the north wall (North Shaft One) of the Valley Temple, near the northeast corner of the building. It can be plainly seen that it would have been impossible for stone-robbers to remove the blocks from within, so this shaft must be an original feature of the building which has never previously been reported. A cut groove, possibly for the insertion of a timber, may be seen in the block at the top in this photo. SUPPLEMENTARY PLATE 7-75. 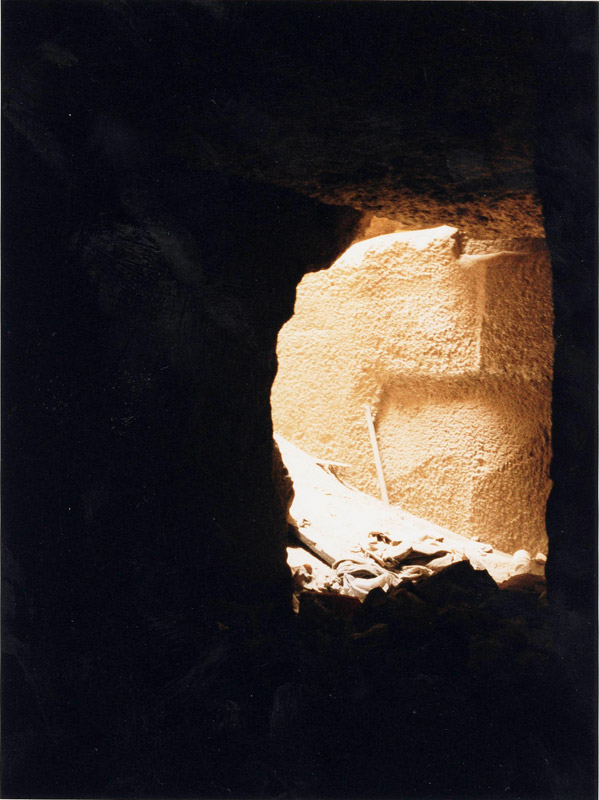
SUPPLEMENTARY PLATE 7-75. Inside the Valley Temple Blind Room, looking south towards the patch illuminated by light coming down through the vertical shaft in the south wall. The limestone blocks are smoothed but not finished in this chamber, and there are many unexplained features which require careful study under better lighting conditions, after the chamber has been entirely cleared of windblown sand and rubbish (if such a happy day shall ever come!) Petrie is the only archaeologist who recognised the importance of this Blind Room, which was contemptuously disregarded by Hölscher, who refused to include it in his plan of the temple. The chamber has never been properly cleared since antiquity, since Hölscher could not be bothered with it. The far limestone corner block is absolutely huge, probably in the tens of tons. It shows traces of an edge at the angle, but a strange massive indentation in the stone suggests that originally a wooden structure existed here, with the indentation acting as a kind of socket for part of it. I believe that gangways may have been used in some of the horizontal passages and wooden stairways three stories high were erected inside some or all of the vertical shafts within the walls. These may have connected with horizontal passages at successive levels. Obviously, I was unable to explore the vertical passages by suspending myself on a rope, as I had no rope, or I could have dangled and looked for higher level passages than those which I explored at ground level. I believe the Valley Temple is absolutely honeycombed with a complex interior structure of these passages and chambers, of which I have only seen a fraction. SUPPLEMENTARY PLATE 7-76. 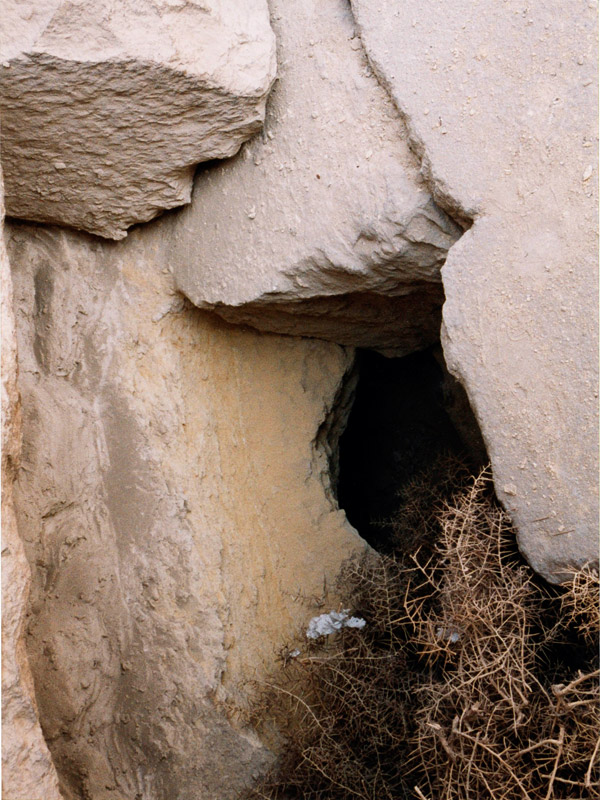
SUPPLEMENTARY PLATE 7-76. This hole in the northeast corner of the Valley Temple’s north wall leads into a small chamber. The opening faces east and is at a level below the top of the roof (which lies above the top limestone blocks in this photo). I was unable to enter this hole because of the many sharp thorns on the plant growing in front of it. I tried repeatedly, but it was like trying to pass through a forest of razor blades. Whatever this Egyptian weed is, and my local botanical knowledge is inadequate to say, it gets its way without argument. Because of it, I was unable to discover whether this chamber leads into yet another vertical shaft like the ones further west within the wall, or otherwise into a horizontal passage inside the wall. FIGURE 52. 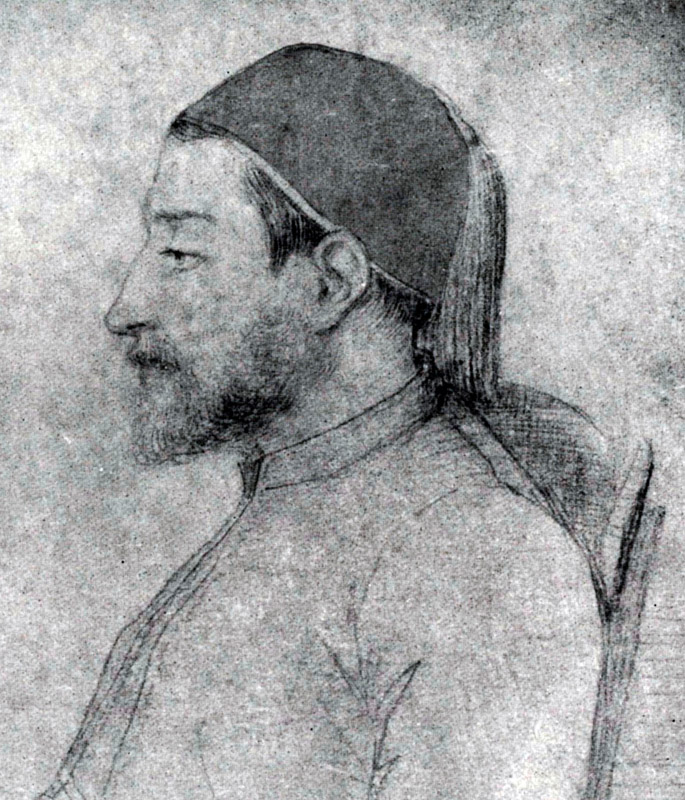
FIGURE 52. A portrait of Auguste Mariette, drawn by Théodule Devéria in 1859, known as the Mayer Portrait of Mariette after Horace L. Mayer, who acquired it in 1930 from the heirs of Luigi Vassali. Reproduced from William Kelly Simpson, ‘A Portrait of Mariette by Théodule Devéria’, in Bulletin de l’Institut Français d’Archéologie Orientale, Volume LXXIV, 1974, pp. 149-50, and Plate XVII.) FIGURE 54. 
FIGURE 54. This is an imagined reconstruction of the interior of the Valley Temple of Giza. We see here the transverse hall, which runs north to south, at the eastern end of the structure. Here it is called by the name of the Pillared Hall (Pfeilersaal in German). A row of statues of King Chephren is envisaged here, sitting in the tranquil and eternal deathly gloom of faint light filtering in through narrow slits in the roof. The pillars are of solid granite, massive blocks weighing tens of tons each. The floor is of white Egyptian alabaster, called travertine. This is a very evocative view drawn by A. Bollacher and based upon the reconstruction by Uvo Hölscher, who excavated the structure fully for the first time. It was published as Plate 5 in Hölscher’s book, Das Grabdenkmal des Königs Chephren (The Funerary Monument of King Chephren), Leipzig, 1912. Fragments of many Chephren statues have been found in the vicinity, and one large whole one is preserved in the Egyptian Museum at Cairo. It was thrown down a well beneath the temple, probably by priests who hid it there in a time of turmoil to preserve it. The Old Kingdom period of Egypt came to an end with the Sixth Dynasty, when terrible droughts and flood and plagues devastated the country for about 150 years, between approximately 2150 BC and 2000 BC. During this period, social order broke down and mobs rampaged around the Giza Plateau smashing everything, including the statues of Chephren envisaged here. FIGURE 55. 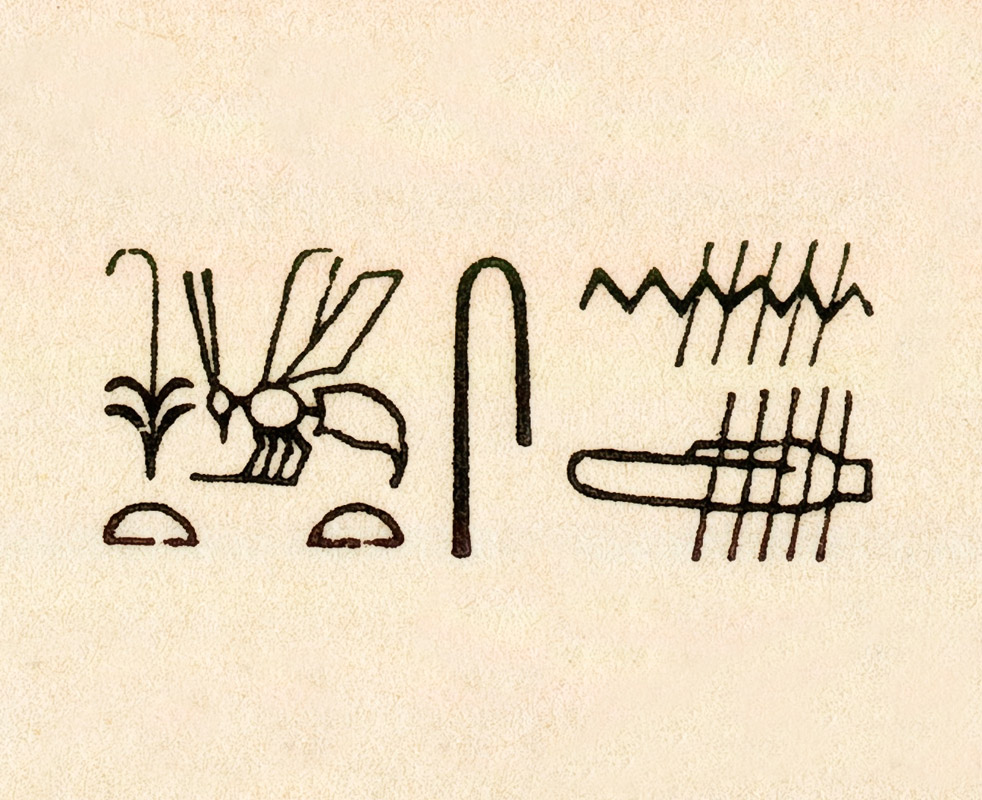
FIGURE 55. This hieroglyphic inscription of the name of King Send, or Sened, ‘the Frightful’ or ‘the Feared One’, fifth king of the Second Dynasty, was found on a shard of a thin-walled diorite bowl during excavations by Uvo Hölscher at the Valley Temple at Giza in 1909, published in 1912, and its existence was never mentioned again in the archaeological literature except once in passing by George A. Reisner, who was working nearby at Giza at the time it was discovered and saw it. The royal name was not written inside a cartouche, because cartouches were not yet in use at that period. However, the sedge and the wasp at left are the indications that he is being described as ‘King of Upper and Lower Egypt’. This is the only archaeological evidence of the connection of any king of Egypt with the Valley Temple, other than King Chephren of the Fourth Dynasty. |


