


EXPOSING THE BIG LIE THE OSIRIS SHAFT AT GIZA AND ITS MYSTERIES THE PYRAMIDS ARE TOO OLD THE TRUE LOCATION OF THE ROYAL TOMBS AT GIZA A KING EIGHT FEET TALL THE ‘LOST KINGS’ AND A PYRAMID OF THE FIRST DYNASTY THE SPHINX AND THE VALLEY TEMPLES AT GIZA STONEHENGE IN AFRICA 
 |
Supplementary images not incuded in the book can be found here and animations with voice over can be found in the Multimedia section.  FIGURE 1. 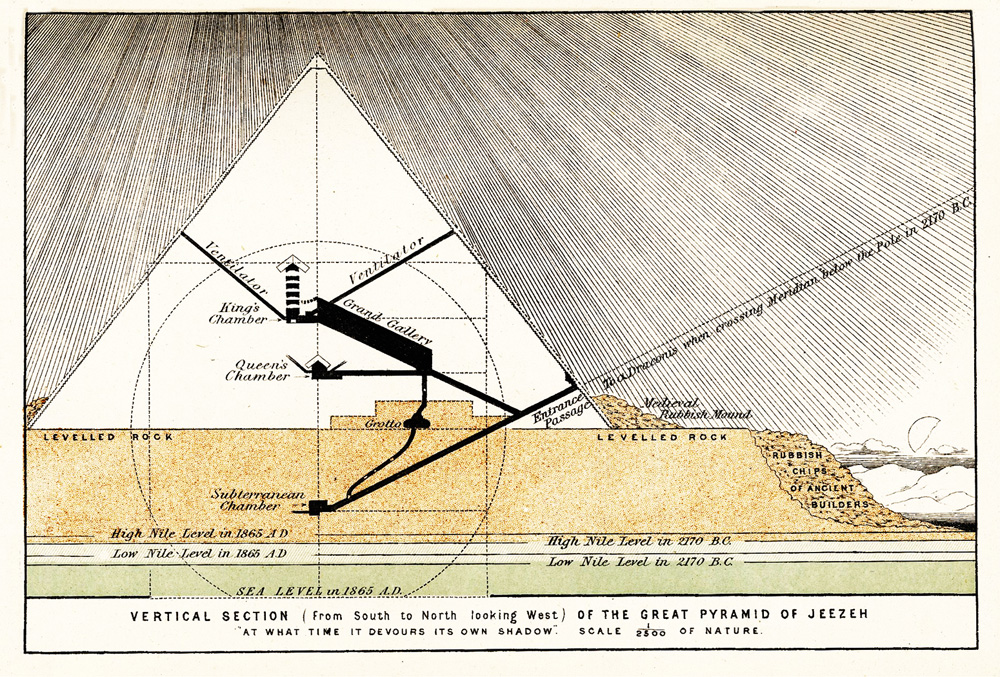
This is a section view of the Great Pyramid as seen from the east, which demonstrates the carefully levelled surface to the north (which is to the right in this view) of the Great Pyramid, where the sun shadows were cast for determining the precise length of the year. In particular, there was a ‘north meridian line’ laid out on the surface from the base of the pyramid to measure the noon shadow at each equinox, which was less than five feet long. A stone connected with this precise spot at the base has been removed in ancient times. The rubbish mound portrayed here up against the north face of the pyramid has been long since removed. The longest shadow cast by the Great Pyramid beyond its own base extended 268 feet north at noon on the winter solstice, hence the need for a shadow floor on this levelled bedrock. (The limestone flooring of the shadow floor itself was stripped away long ago by stone robbers.) Piazzi-Smyth has drawn a line to the sky showing that in 2170 BC, the star Alpha Draconis would have crossed the line of sight from the Descending Passage which looked precisely at the meridian, hence allowing a perfect meridian transit or culmination to be observed every night. This is not a detail which I have chosen to discuss, as the astronomy of the Great Pyramid is too complex a subject for discussion here, and I do not necessarily go along with the Alpha Draconis idea. This drawing is from Charles Piazzi-Smyth,Our Inheritance in the Great Pyramid, London, 1880, Plate 6 at front of the book. The ‘shadow floor’ which lay across the levelled bedrock to the north of the Great Pyramid must be included in the Giza Precinct in order for the true plan of Giza to be revealed. If we include this northern extension beyond the base of the Great Pyramid, we get the ‘Giza Shadow Square’, the southwest corner of which is defined by the Pyramid of Mycerinus (see FIGURE 2). From the Shadow Square may be constructed (as in FIGURE 5) the ‘Giza Perfect Square’, which is slightly larger, but which shares its southwest corner with the Shadow Square. The small Pyramid of Mycerinus is thus a kind of ‘anchor’-object which holds both the Shadow Square and the Perfect Square in place at their common bottom southwest corner. From these two squares many geometrical correlation details may be derived for the main Giza monuments which are accurate to approximately two feet within an area of approximately 11 million square feet. The massive over-redundancy of correlations revealed within these squares cannot have a ‘normal’ purpose, and the fact that more than one square was used suggests an attempt at concealing the full design concept of the Plateau by means of multiple layers of design, such that if one layer were discovered, the others would remain undetected. These intellectual games played by the Egyptian priests are presumed to have a religious or ‘magical’ motivation, as part of a pious effort to simulate the structure of the cosmos as conceived by them, as part of their fundamental religious need to ‘honour Maat (cosmic order)’. They also clearly wished to conceal their sacred secrets from the eyes of the profane. FIGURE 2. 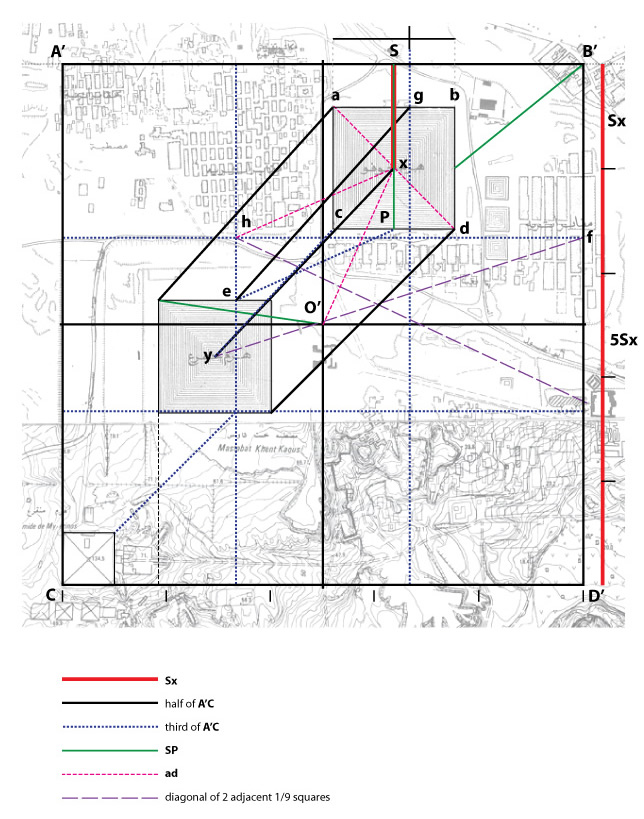 FIGURE 2. The Shadow Square of Giza. The northern boundary was determined by point S, which is the tip of the maximum meridian shadow cast by the Great Pyramid at noon on the day of the Winter Solstice (hence the name ‘Shadow Square’). The shaded square near the top is the Great Pyramid, whose apex is x and whose corners are a, b, c, and d. The shaded square below and to the left of it is the Pyramid of Chephren, whose apex is y. At the bottom left of the Shadow Square is the small (unshaded) Pyramid of Mycerinus, whose southwest corner is point C. Solid lines may be seen dividing the Shadow Square into four equal smaller squares (with side lengths of ½ A’C), and dotted lines may be seen dividing the Shadow Square into nine equal smaller squares (with side lengths of 1/3 A’C). Since the Shadow Square was constructed by multiplying the length Sx (the total maximum meridian shadow length) times five and using that value as the side length, scales are shown at right of the design and below it, showing where those fivefold divisions occur, though they do not appear to relate to the monuments. The geometrical connections between key points on the monuments are shown by the different types of lines representing different standard lengths, as indicated by the key. For instance, the diagonal of the Great Pyramid, ab, is also equal to the distance between the apex of the Great Pyramid and the centre of the Shadow Square, as shown by the line O’x. The same distance separates x and h, and the distance occurs once again defining the distance between the southwest corner of the Pyramid of Chephren and the southern boundary of the Shadow Square. The other monument point correlations may be seen in the plan and are described in the main text. FIGURE 3. 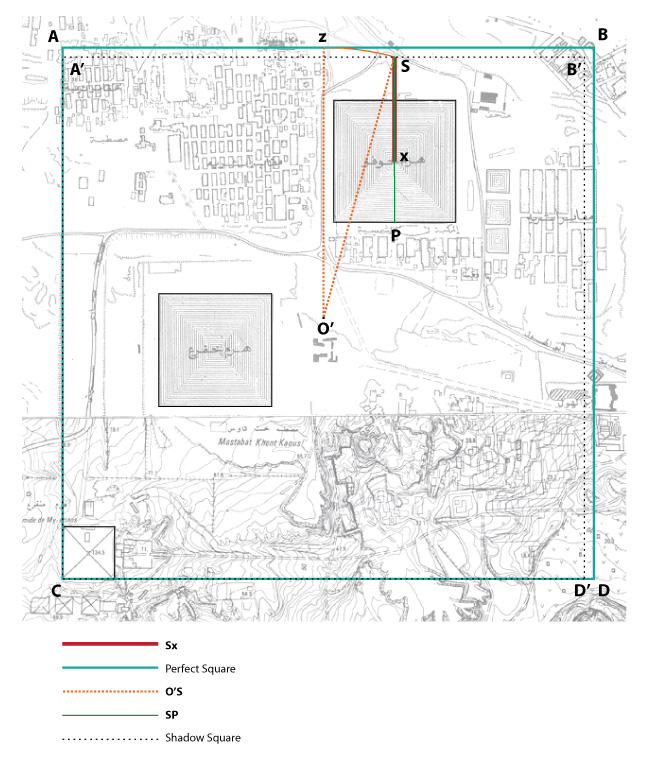 FIGURE 3. The construction of the Perfect Square of Giza (ABCD) from the Shadow Square of Giza (A’B’CD’). The Perfect Square is only slightly larger, but it has completely different properties, and many additional correlations of the key points of the monuments emerge from it. Point C, the southwest corner at bottom left, is in common between the two squares, and is the southwest corner of the Pyramid of Mycerinus. O’ is the centre of the Shadow Square; the centre of the Perfect Square is slightly above and to the right of it, but is not shown here, to avoid confusing the reader. The ‘Eye of Ra’ at Giza, seen in FIGURE 4, cannot be constructed in the Shadow Square in such a way that it intersects any key points, but only does this in the Perfect Square. I constructed the Perfect Square by treating the line O’S as a radius and swinging it up to the vertical, thus establishing a new and slightly higher northern boundary. Point S is the tip of the maximum meridian shadow length. The length of the side of the Shadow Square is 3,232.84 feet (accurate to one foot), and the area is 10,451,254.47 square feet. The length of the side of the Perfect Square is 3,291.59 feet (accurate to one foot), and the area is 10,834,564.73 square feet. It is remarkable that two squares so close to one another in size should have such different properties in relation to the monuments, but also that both have deep and intimate geometrical connections with them. If the two squares are laid on top of one another, and if the Golden Giza Plan published in The Sphinx Mystery is laid on top of them as well, then we have the total design plan for the Giza Plateau, which is a triple-plan. (The ‘Eye of Ra’ is an additional feature, or may be treated as part of the Perfect Square design.) No one was ever meant to discover all of these plans, as the three separate layers of mystery were supposed to be impenetrable to any investigator, so that anyone who might discover one would never discover all three. Sometimes triple-layered designs underlay major structures: this was the case with King Zoser’s Step Pyramid at Saqqara and also with King Enezib’s Pyramid at Saqqara, which is described in Chapter 6. FIGURE 4. 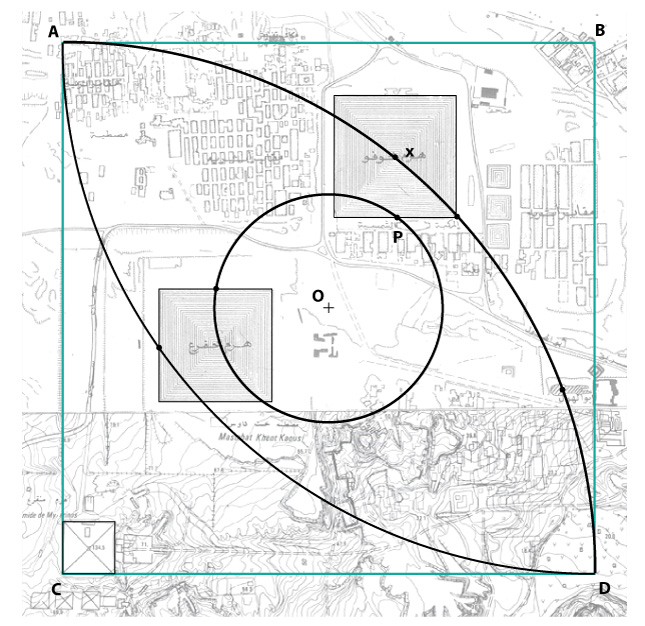 FIGURE 4. 'The Eye of Ra’ at Giza. This can meaningfully be inscribed only in the Perfect Square (where it intersects many key points of the monuments), not in the Shadow Square (where it intersects none). If you put a compass point on B and inscribe an arc between A and D, and put a compass point on C and inscribe an opposite arc between A and D, you get the eye shape. In geometry this is known as a vesica piscis, and is usually derived by the intersection of two circles of equal size. It is the Egyptian hieroglyph for the letter ‘r’ and in Egyptian mathematics it is also the sign meaning ‘fraction’. Since the Egyptians did not write vowels, it also means ‘Re’ or ‘Ra’, which is the name of the sun god. This inscribed hieroglyph intersects (1) the apex of the Great Pyramid, (2) the southeast corner of the Great Pyramid, (3) the midpoint of the waist of the Sphinx, (4) the midpoint of the base of the western face of the Pyramid of Chephren. If you take a compass point and put it on the centre of the Perfect Square, point O, and draw a circle of radius OP, it intersects both point P (the midpoint of the base of the southern face of the Great Pyramid) and the midpoint of the base of the northern face of the Pyramid of Chephren. The ‘Eye of Ra’ thus intersects six key points of the monuments within the Perfect Square of Giza. Because these are curves inscribed on the sloping surface of the Plateau rather than straight lines, as we find with all the other monument point correlations, the accuracy is slightly fuzzier than it is with the straight lines, and may be within a few feet of some points rather than within only one or two feet. However, as the Perfect Square contains nearly 11 million square feet, such a slightly diminished level of accuracy is still rigourous and acceptable. This ‘Eye of Ra’ gazes straight up at the sky, at the central point which we call the zenith. It is a fitting symbol of the solar nature of the entire Giza complex. FIGURE 5. 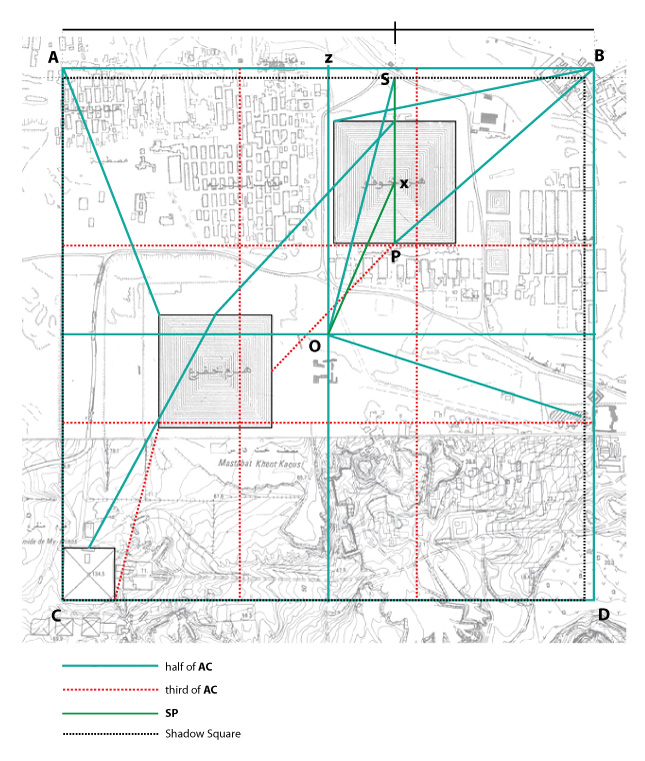 FIGURE 5. The Perfect Square of Giza. This square has a side length of 3,291.59 feet (accurate to within one foot) and an area of 10,451,254.47 square feet. It was derived from the Shadow Square of Giza, by the method shown in Figure 4. The centre of this square, O, is in a slightly different location than point O’, which is the centre of the Shadow Square (not shown here). If the top side of this square is divided in golden section, as shown here, with the shorter end to the right (east), and a vertical line is dropped from that point, it intersects the apex of the Great Pyramid, and also passes through the tip of the maximum meridian shadow (point S). That shadow (which originally defined the Shadow Square, from which this Perfect Square was then derived indirectly) is therefore marked by the golden section in a square of only a second order derivation, not of primary derivation, from itself. In this square, another set of correlations of key monument points emerges which is separate from those of the slightly smaller Shadow Square. The most remarkable is that the centre of this square, O, is now seen to be distant from the apex of the Great Pyramid by the distant SP, which again is derived from the shadow (Sx being the total shadow length). The distance of half of AC, which is the side of one of the four small squares into which the main square can be divided, is equal to: (1) the distance between point A, the northwest corner of the Perfect Square, and the northwest corner of the Pyramid of Chephren, (2) the distance between point B, the northeast corner of the Perfect Square, and P, which is the midpoint of the base of the southern face of the Great Pyramid, (3) the distance between point B and the northwest corner of the Great Pyramid, (4) the distance between S, which is the tip of the maximum meridian shadow, and point O, which is the centre of the Perfect Square, (5) the distance between point O and the head of the Sphinx, (6) the distance between the midpoint of the base of the northern face of the Great Pyramid and the midpoint of the base of the northern face of the Pyramid of Chephren, and (7) the distance between the midpoint of the base of the northern face of the Pyramid of Chephren and the midpoint of the northern face of the Pyramid of Mycerinus. If we take 1/3 of the distance AC, which is the side of one of the nine smaller squares into which the Perfect Square can be divided, we find that it is equal to (1) the distance between the southwest corner of the Pyramid of Chephren and the southeast corner of the Pyramid of Mycerinus, and (2) the distance between P, which is the midpoint of the base of the southern face of the Great Pyramid, and the midpoint of the base of the eastern face of the Pyramid of Chephren. All of these key monument point correlations are separate from and additional to those found in the Shadow Square. It is remarkable how each square generates its own separate but related set of monument correlations. The two squares, the Perfect Square and the Shadow Square, were meant to complement each other as well as the Golden Giza Plan reproduced as FIGURE 7.25 in my earlier book The Sphinx Mystery (see it on www.sphinxmystery.info), which actually reproduces some of these same point correlations purely on the basis of a common angle rather than as a common distance measure. The Giza Plateau was thus laid out in the most complex imaginable multiply-correlated triple design plan which was meant to be impenetrable to any investigator and to remain forever secret. It was specifically designed so that if anyone ever figured out one of the design plans they would never figure out the other two, and the decoded information would thus always be incomplete. However, they did not reckon that someone armed with modern surveys could figure out all three of them, despite the seeming impossibility of doing so. (Giza plan designs drawn by Robert Temple and graphics version by Robert Temple and Jonathan Greet) SUPPLEMENTARY PLATE 1. 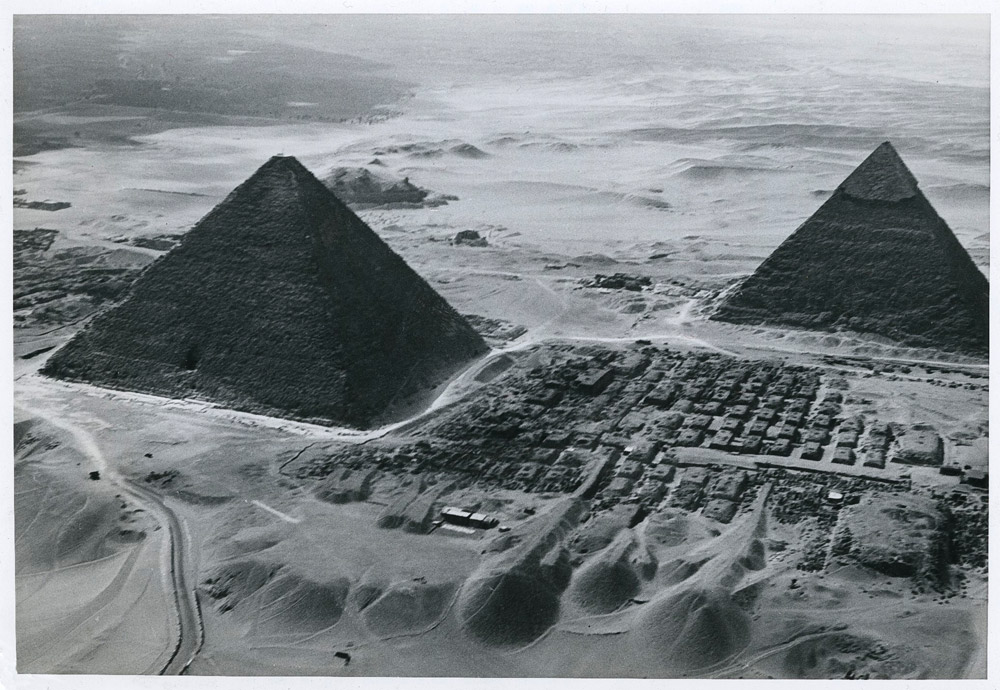
SUPPLEMENTARY PLATE 1 Aerial photo of the Great Pyramid (left) and the Pyramid of Chephren (right), taken from the northwest, looking southeast. This photo shows the entrance to the Great Pyramid as a dark hole in the side. The ‘shadow floor’ is well seen here from the air, as the levelled bedrock surface extending from the pyramid to the northern edge of the plateau, where the road descends (a road which no longer exists.) In the foreground are the mastaba tombs of royal officials, constituting the ‘west Giza’ necropolis area. This is the only aerial photo of Giza taken from the northwest which I have ever seen, and hence the only aerial view which shows the levelled surface (at far left) of what was once the Great Pyramid Shadow Floor. In this photo, the mastabas built during the Old Kingdom period west of the Great Pyramid (right, foreground) appear to extend to the northern boundary of the Giza Square, suggesting that in the Fourth Dynasty, the true geometrical northern boundary of the sacred Giza Complex was still known by the priests. (Collection of Robert Temple, photographer and date unknown) SUPPLEMENTARY PLATE 2. 
SUPPLEMENTARY PLATE 2. This Christian Coptic design preserved at the Luxor Museum in Egypt shows the central early Christian symbol of ‘the fish’ standing upright, with a pillar on each side and an arch above. ‘The fish’ was originally a vesica piscis, which is a geometrical design, as described in the main text of Chapter One and as shown in FIGURE 4 of ‘the Eye of Ra at Giza’. It is perhaps no coincidence that this ‘fish’ contains as its ‘eye’ the ancient solar symbol of a circle with a disc in the centre. Thus, here we have, thousands of years later, a solar symbol still combined with a vesica piscis by the Coptic Church of Egypt. |

